Have you ever wondered why a small fish-shaped cake became one of Japan’s most loved street sweets? Taiyaki looks playful on the outside, but inside it holds warm, comforting flavors that people of all ages enjoy. This simple dessert proves that good food does not need to be complicated to be special.
Why This Taiyaki Recipe Is Special
This homemade Taiyaki recipe is simple, flexible, and beginner-friendly. It uses basic ingredients that are easy to find, and the batter comes together quickly without special tools.
What makes this recipe special is its balance. The batter is light and soft, while the filling can be changed to match your taste. You can keep it traditional with red bean paste or try modern fillings like chocolate or custard.

What Is Taiyaki たい焼き?
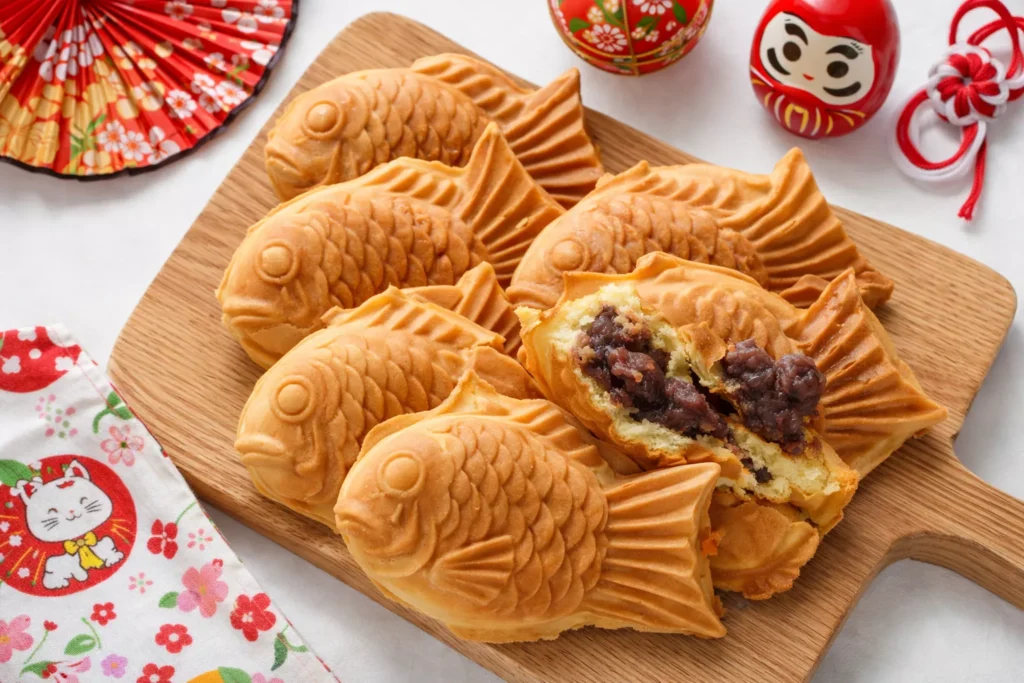
Taiyaki たい焼き is a Japanese fish-shaped cake that is cooked in a special mold. The outside looks crisp and golden, while the inside stays soft and slightly fluffy. The fish shape is inspired by sea bream, which is a symbol of good luck in Japan. Over time, taiyaki became popular as a street snack and home treat. Today, it is enjoyed in many flavors and styles, both traditional and modern.
Essential Ingredients and Why They Matter
Key Ingredients (材料)
Taiyaki たい焼きThese simple ingredients create the soft batter and crisp edges that make homemade taiyaki so enjoyable. Each card explains why the ingredient matters and how you can adjust it if needed.

Step-by-Step Instructions
Step 1: Prepare the Batter Base
In a bowl, mix the beaten egg, granulated sugar, and salt until smooth. Add the milk and water, then stir gently until well combined.

Step 2: Add Dry Ingredients and Rest
Sift together the cake flour, baking powder, and baking soda. Add this mixture little by little to the wet ingredients while mixing. Once smooth, cover the bowl and let the batter rest in the refrigerator for 30 minutes.

Step 3: Fill the Taiyaki Mold
Heat the taiyaki pan over low to medium heat and lightly oil it. Pour a thin layer of batter into the mold. Add about 1.5 tablespoons of your chosen filling in the center, then pour a small amount of batter on top to cover.


Step 4: Cook Until Golden
Close the mold and cook for about 5 minutes, turning once if needed. Cook until both sides are golden brown. Each taiyaki should hold about 50 to 53g of filling.
")
Secrets to Success and Expert Tips
These practical tips will help you make golden, well-shaped, and evenly cooked taiyaki every time:
-
♥
Let the batter rest before cooking
Resting the batter allows the flour to hydrate fully, which helps create a smoother texture and better browning. -
♥
Keep the heat low to medium
Taiyaki cooks best slowly. Gentle heat prevents burning while allowing the inside to cook through evenly. -
♥
Do not overfill with batter or filling
Too much batter or filling can cause leaking and uneven shapes. A balanced amount keeps the fish mold clean and neat. -
♥
Lightly oil the pan each time
A thin layer of oil helps release the taiyaki easily and gives the surface a crisp, golden finish. -
♥
Flip gently and cook evenly
Turning the mold carefully ensures both sides cook evenly and keeps the fish shape sharp and defined.
Assembly and Presentation
Taiyaki is assembled directly in the mold, making it simple and clean.
- Always add batter first, then filling, then batter again
- Keep the filling centered to avoid spills
- Serve warm for best texture
For presentation, arrange taiyaki on a simple plate or wooden tray. The fish shape already looks decorative, so extra garnish is not needed.
")
Hana’s Recipe Tips
Hana recommends keeping the batter slightly thin so it spreads easily inside the mold. She also suggests weighing the filling once or twice to understand the ideal amount. This helps create evenly shaped taiyaki every time. Cooking slowly gives better color and a softer inside.
Recipe Variations
Taiyaki is very flexible, and you can easily adjust the filling, batter, or presentation to suit your taste. Here are some simple ways to customize your homemade Taiyaki たい焼き:
Try Different Fillings
Change the filling to create new flavors:
- Sweet red bean paste for a classic taste
- Chocolate for a rich and modern option
- Custard for a smooth and creamy center
Flavor the Batter
Add mild flavors directly to the batter:
- Vanilla extract for gentle sweetness
- Cocoa powder for chocolate taiyaki
- Matcha powder for a light tea flavor
Adjust Size and Thickness
You can change the look and texture easily:
- Use less batter for thinner, crisp taiyaki
- Add slightly more batter for a softer center
- Make smaller taiyaki for bite-size servings
Try New Serving Styles
Serve taiyaki in different ways depending on the occasion:
- Serve warm as a street-style snack
- Pair with tea or coffee for dessert
- Cut in half to show the filling for presentation
Recipe Variations
- Chocolate Taiyaki: Use dark or milk chocolate for a rich center
- Custard Taiyaki: Smooth and creamy with a soft bite
- Mixed Filling: Combine red bean and custard for contrast
- Mini Taiyaki: Use smaller molds for bite-size snacks
These variations make taiyaki suitable for many tastes and occasions.
More Japanese Recipes to Try
If you enjoy making Taiyaki たい焼き, you may also like other traditional Japanese sweets that are simple and comforting. Japanese Dorayaki (どら焼き) is a soft pancake dessert filled with sweet red bean paste and is perfect for tea time.
Another classic worth trying is Ohagi (Botamochi) おはぎ (ぼたもち), a seasonal rice dessert coated with sweet red bean paste. It is often enjoyed during spring and autumn and has a soft, satisfying texture.

 おはぎ (ぼたもち)")
Conclusion
Homemade Taiyaki たい焼き is a simple and enjoyable recipe that brings a classic Japanese treat into your kitchen. With a soft batter, flexible fillings, and easy steps, this recipe works for beginners and experienced cooks alike. The fish-shaped cake is fun to make and satisfying to eat, making it perfect for sharing or enjoying fresh from the pan.
FAQs
Can I make taiyaki without a taiyaki pan?
A taiyaki pan is recommended for the traditional shape, but the batter can be used in other molds if needed.
Is taiyaki healthy?
Taiyaki is a balanced dessert when enjoyed in moderation. It contains protein from eggs and energy from flour and fillings.
Can I prepare the batter ahead of time?
Yes, the batter can be stored in the refrigerator for up to 24 hours.
How do I prevent taiyaki from sticking?
Lightly oil the mold before each batch and keep the heat low.
Can I reduce the sugar?
Yes, sugar can be adjusted depending on the sweetness of the filling.

Taiyaki たい焼き at Home (Japanese Fish-Shaped Cake)
Course: DessertCuisine: JapaneseDifficulty: Easy6
servings35
minutes10
minutes180
kcalA classic Japanese street dessert made with soft batter and a sweet filling, cooked in a fish-shaped mold until golden and crisp. This homemade taiyaki recipe is simple, flexible, and perfect for beginners.
Ingredients
200 g cake flour
1 teaspoon baking powder
1 teaspoon baking soda
100 ml milk
100 ml water
1 egg
20 g granulated sugar
A small pinch of salt
Red bean paste (as needed)
Chocolate or custard (optional fillings)
Directions
- In a bowl, whisk the egg with sugar and salt until smooth. Pour in the milk and water, then mix gently until fully combined.
- Sift the cake flour, baking powder, and baking soda together. Add the dry mixture to the bowl little by little while stirring. Once smooth, cover the batter and let it rest in the refrigerator for 30 minutes.
- Heat a taiyaki pan over low to medium heat and lightly oil it. Pour a thin layer of batter into the mold, add about 1.5 tablespoons of your chosen filling in the center, then cover with a small amount of batter.
- Close the mold and cook for about 5 minutes, turning once if needed, until both sides are evenly golden. Remove carefully and repeat with the remaining batter.
Notes
- ✪ Letting the batter rest helps create a smoother texture and even browning.
✪ Keep the heat gentle to avoid burning the fish shape.
✪ Do not overfill with batter or filling, as this may cause leaking.
✪ Taiyaki is best enjoyed warm, but leftovers can be reheated in a pan.
Did you make this recipe?
Tag @jp.dishes on Instagram so we can see your delicious creation!