
Have you ever tasted something so sweet, soft, and nostalgic that it felt like a warm hug from the past? If not, you’re in for a treat! This classic Japanese dessert made with glutinous rice and sweet coatings is more than just a snack—it’s a heartfelt tradition passed down through generations. But did you know there’s a seasonal twist to this dessert that most people don’t realize? Let’s explore the history and recipe of Ohagi and how you can make it from scratch at home.
If you enjoy Japanese baking, you might also like this Melon Pan recipe a sweet, fluffy bread with a crispy cookie crust.
Table of Contents
What Is Ohagi (Botamochi)?
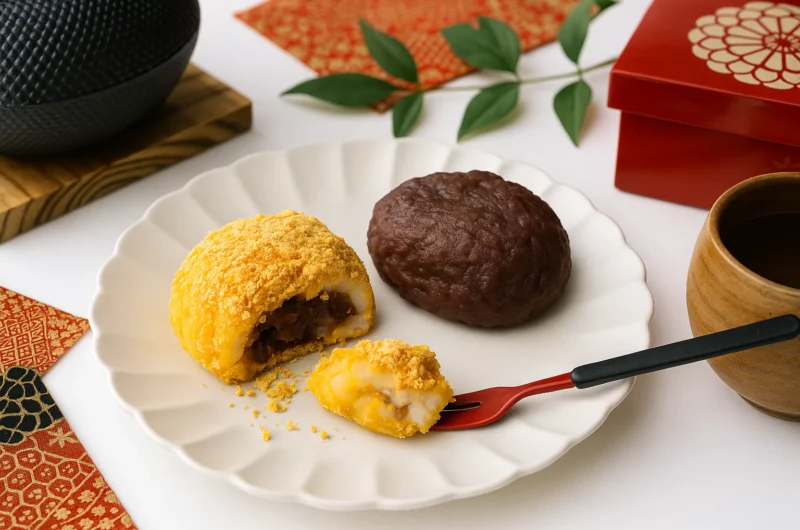
This traditional Japanese sweet features a chewy rice base wrapped or coated with sweet elements such as red bean paste, roasted soybean flour, or black sesame. The treat is soft, naturally sweet, and deeply comforting. It’s often made during Buddhist holidays in spring and autumn, connecting people with nature and memory through food.
Time Commitment: About 1 hour
Skill Level: Beginner to intermediate
Despite its elegant look, this treat is relatively simple to prepare. You’ll need basic tools like a rice cooker, mixing bowls, and your hands. It’s an excellent family activity and perfect for celebrations or quiet weekends.

Ohagi @JapanDishes
Jump to Recipe Print RecipeWhat Makes This Recipe Special?
The beauty of making Ohagi lies in its simplicity and cultural richness. You get to experience a timeless Japanese tradition right in your kitchen. It doesn’t rely on fancy equipment or hard-to-find ingredients. Instead, it’s about textures, taste, and technique. Each bite offers a combination of earthy sweetness and soft chewiness that stays with you.
The flexibility of Ohagi is another bonus—you can change the fillings and coatings based on your preference or dietary needs. Whether you follow the classic approach or create a modern twist, the result will always feel meaningful.

Ohagi おはぎ@JapanDishes
Botamochi vs. Ohagi: What’s the Difference?
While these terms are often used interchangeably, there’s a seasonal and symbolic distinction:
- Botamochi is the springtime name, derived from “botan,” the Japanese word for peony.
- Ohagi refers to the same treat made in autumn, named after the “hagi” or bush clover flower.
Though the preparation remains essentially identical, the change in name honors Japan’s deep cultural link to seasonal cycles and nature’s beauty. Some regions might also vary the texture slightly—Botamochi may use smoother red bean paste, while Ohagi might include a chunkier version.
Understanding this subtle difference adds a layer of appreciation to the dessert, especially when making it for seasonal observances.

Ohagi おはぎ @JapanDishes
Key Ingredients and Their Roles
Let’s take a closer look at what you’ll need:
For the Rice Base:
- 1½ cups sweet rice (glutinous rice or mochigome)
- ¾ cup short-grain white rice (Japanese style)
- 2½ cups water
The combination of these two rice types gives the ideal balance of stickiness and texture.
Saltwater for Handling:
- 1 teaspoon kosher salt
- 1 cup water
Used to moisten hands and prevent sticking during shaping.
For the Sesame Coating:
- 6 tablespoons black sesame seeds (toasted and ground)
- 2 tablespoons sugar
Provides a nutty, slightly sweet crunch.
For the Kinako Coating:
- 6 tablespoons roasted soybean flour (kinako)
- 2 tablespoons sugar
Mild and aromatic, this is a favorite among children and adults.
For the Sweet Filling and Coating:
- 1.3 pounds sweet red bean paste (anko)
This can be homemade or store-bought. Smooth or chunky types work well, depending on your preference.

Ohagi おはぎ Ingredients
Optional Swaps:
- Use coconut sugar for a deeper flavor
- Add matcha powder to kinako for color and taste
- Substitute red bean paste with mashed chestnuts or sweet potatoes for a twist
Step-by-Step Guide to Making This Treat
1. Wash the Rice
- Mix the glutinous and white rice in a large bowl.
- Rinse quickly with water and pour it off.
- Gently rub the grains together, rinse again, and repeat until the water runs nearly clear.
- Drain well using a fine sieve.

2. Cook the Rice
- Place the washed rice into your rice cooker.
- Add 2½ cups water and let it soak for 20 minutes.
- Cook on the regular setting.

3. Prepare the Fillings and Coatings
While the rice cooks:
- Grind sesame seeds in a mortar and pestle, then mix with sugar in a bowl.
- Mix kinako and sugar in a separate bowl.
- Scoop out red bean paste using a cookie scoop to create 8 equal-sized balls.

4. Pound the Rice
- Mix the salt into 1 cup of water.
- Soak your rolling pin or pestle in the saltwater.
- While the rice is still hot, pound it gently. Aim to mash about half of the grains while leaving some texture intact.

Assembly Instructions
Now that everything is ready, it’s time to put the pieces together.
Filled Version (Red Bean Inside)
- Wet your hands with saltwater.
- Take about 40 grams of the pounded rice and flatten it into a circle.
- Place a red bean paste ball in the center.
- Fold the rice around it and shape into an oval.

Coated Version (Rice Outside)
- Make rice balls without filling.
- Flatten 2 teaspoons of red bean paste on a piece of plastic wrap.
- Wrap it around the rice ball evenly.

Applying Coatings
- Roll the filled rice balls in the kinako or sesame sugar mixture.
- Place each ball in a foil or paper liner to keep things tidy.


Serving Suggestion: Arrange neatly on a tray and serve with green tea. For seasonal flair, add a cherry blossom or autumn leaf garnish depending on the time of year.

Storage and Preparation Tips
- Best enjoyed within 12 hours of making.
- Store in a cool place if serving the same day.
- For longer storage, place in an airtight container and refrigerate, covered with a thick towel to avoid drying out.
- Freeze for up to one month. Thaw in the fridge overnight and warm gently before serving.
Hana’s Helpful Tips for Better Ohagi
Hana, a home cook who learned the recipe from her grandmother in Kyoto, shares her favorite tips for making perfect Ohagi:
- Use a cookie scoop to make evenly sized red bean balls.
- Keep your hands moist with saltwater to avoid rice sticking.
- Only mash the rice halfway to keep some chewy texture.
- Grind sesame seeds fresh to get the full flavor in sesame-coated Ohagi.
- Use small foil cups for easy serving and presentation.
She adds, “Each rice ball carries a little piece of love. The process of shaping it is just as meaningful as the taste.”
Ohagi (Botamochi) おはぎ (ぼたもち)
Course: DessertCuisine: JapaneseDifficulty: Easy8
servings20
minutes30
minutes~180 per piece
kcalOhagi (おはぎ), also called Botamochi (ぼたもち), are traditional Japanese rice sweets made with mochigome (glutinous rice) and coated in anko, kinako. Soft, chewy, and lightly sweet, they’re often enjoyed during seasonal holidays like Ohigan.
Ingredients
- For the Rice Base:
1½ cups glutinous rice (mochigome)
¾ cup Japanese short-grain white rice
2½ cups water- For the Saltwater (for handling):
1 tsp kosher salt
1 cup water- For Red Bean Paste:
1.3 lb sweet red bean paste (anko), smooth or chunky
- For Kinako Coating:
6 Tbsp kinako (roasted soybean flour)
2 Tbsp sugar- For Sesame Coating:
6 Tbsp toasted black sesame seeds
2 Tbsp sugar
Directions
- Rinse and Soak the Rice
- Combine the glutinous and white rice in a bowl. Rinse quickly, discard water, and repeat 2–3 times until the water is nearly clear. Drain well.
- Cook the Rice
- Transfer to a rice cooker, add 2½ cups water, and soak for 20 minutes. Cook using the standard setting.
- Prepare Coatings and Filling
- While rice cooks, grind black sesame seeds and mix with sugar. In another bowl, mix kinako with sugar. Scoop red bean paste into 8 small balls (about 2 tsp each) and set aside.
- Pound the Cooked Rice
- When rice is done, make saltwater. While still hot, pound the rice with a rolling pin or pestle moistened with saltwater. Stop when it’s about half-mashed—soft but with visible grains.
- Make Filled Ohagi
- Wet hands with saltwater. Scoop 40g of mashed rice and flatten into a circle. Place a red bean paste ball in the center and wrap the rice around it. Shape into ovals.
- Make Coated Ohagi
- Form rice into ovals without filling. Flatten 2 scoops of red bean paste on plastic wrap, place rice ball on top, and gently wrap the paste around it.
- Coat with Toppings
- Roll filled rice balls in kinako or sesame mixtures. Transfer all to foil liners for presentation.
Notes
- Best enjoyed within 12 hours. For later use, refrigerate in an airtight container covered with a towel, or freeze for up to one month.
For a more colorful twist, add matcha to kinako or swap anko for sweet chestnut paste.
Ohagi is named Botamochi in spring (after peony flowers) and Ohagi in autumn (after bush clover), but the recipe remains the same.
Creative Flavor Variations
Want to personalize the recipe? Try these options:
- Matcha Kinako: Mix matcha powder with kinako for a subtle bitterness.
- Fruit-Inspired: Add bits of strawberry or citrus zest inside.
- Chestnut Delight: Use sweet chestnut paste instead of red beans.
- Nut Coating: Roll in finely chopped almonds or walnuts mixed with a pinch of sugar.
This treat is versatile enough to evolve with your taste.
Final Thoughts
This Japanese sweet rice treat offers a delicious way to connect with tradition while enjoying a naturally sweet, healthy snack. With simple ingredients and an easy-to-follow method, anyone can recreate this timeless dish at home. Whether you’re preparing it for a holiday, special event, or just craving something unique, Ohagi delivers comfort and cultural richness in every bite.
So next time you’re looking for a homemade dessert, give this time-honored recipe a try. It’s not just about making food—it’s about making memories, honoring traditions, and discovering the joy of Japanese cuisine.
Common Questions
Is this dessert healthy? Yes. It’s gluten-free, has minimal fat, and uses natural sweeteners. Red beans provide fiber and essential minerals.
Can I use only regular white rice? Not recommended. The stickiness of glutinous rice is key to holding everything together.
What’s the best way to store leftovers? Cool, covered, and refrigerated. You can also freeze them and thaw before serving.
Can children help make these? Absolutely. Let them shape the rice and apply coatings—it’s a fun activity.
Are there regional differences in how this is made? Yes. Some areas use smooth red bean paste exclusively, while others prefer a chunky version.
Now that you know the story and technique behind this beloved dessert, which version will you make first—classic, kinako-covered, or something completely your own?
If you’re planning a trip to Japan, check out this guide to the best capsule hotels in Tokyo under $50 for budget-friendly travel tips.