Have you ever bitten into a chocolate cake so soft and chewy it almost disappears in your mouth?
If you’ve only tried regular chocolate cake, you’re missing out on something truly amazing. What if I told you there’s a chocolate dessert that’s soft, chewy, and buttery not quite a brownie, not a cupcake, and definitely not your usual cake, but something even more delicious? It’s called chocolate butter mochi, and once you try it, you might never go back.
In this post, you’ll learn exactly how to make chocolate butter mochi cake at home. It’s simple, satisfying, and oh-so-chocolatey.
What Makes This Recipe Special?
Chocolate butter mochi is not your average cake. The inside is tender and springy, while the outer layer bakes to a gentle crisp. It has a smooth chocolate flavor, a rich buttery taste, and a unique texture thanks to one secret ingredient: mochiko flour. Best of all, this cake is gluten-free and super easy to make.
You can make this without any complicated gadgets or spending all day cooking. Just mix, pour, bake, and enjoy. The whole process, cooling included, takes around an hour and a half. The actual hands-on time is only about 20 minutes, making it perfect for busy days or baking with kids.
Chocolate butter mochi is a chewy, gluten-free treat made with sweet rice flour. If you’re exploring Japanese-inspired desserts, don’t miss this popular Japanese Basque Cheesecake recipe, known for its creamy, caramelized flavor and simple preparation.
What Is Chocolate Butter Mochi?
Chocolate butter mochi is a Hawaiian-style dessert that blends American baking with Japanese mochi traditions. It’s made with mochiko flour (sweet rice flour), which gives the cake its chewy, mochi-like texture. While classic butter mochi is flavored with coconut or vanilla, this version uses cocoa and melted chocolate for a deeper, richer treat.
This treat is tender and rich with a slight stickiness that makes each bite delightful. It’s not too sweet, making it great for both kids and adults. Because mochiko comes from rice instead of wheat, this treat is naturally gluten-free.

Chocolate Butter Mochi @JapanDishes
Essential Ingredients and Their Roles
To make this chocolate butter mochi cake, you’ll need the following ingredients. Each one plays an important part:
- 2 large eggs: Help hold the cake together and give it structure.
- ¾ cup sugar: Adds the perfect amount of sweetness.
- 5 tablespoons butter (melted): Adds richness and a smooth, buttery flavor.
- 1 ¾ cups milk: Helps create a smooth, pourable batter.
- ¼ cup heavy cream: Makes the cake extra moist and creamy.
- ½ cup semisweet chocolate chips (melted): Adds deep chocolate flavor.
- 2 cups mochiko (sweet rice flour): The key to the chewy mochi texture.
- 2 tablespoons pure cocoa powder: Gives an extra chocolate kick.
- 1 teaspoon baking powder: Helps the cake rise and get fluffy edges.
- ⅛ teaspoon salt: Balances the sweetness.

Chocolate Butter Mochi Ingredients
Substitutions and Variations
- No heavy cream? Use more milk or add 2 tablespoons of sour cream.
- Want dairy-free? Try coconut milk and vegan butter.
- No semisweet chips? Use dark chocolate or even chopped chocolate bars.
Step-by-Step Instructions
Follow these steps to make your chocolate butter mochi cake turn out perfect every time.
1. Preheat and Prepare
Preheat your oven to 180°C (350°F). Take a 9 x 13-inch baking tray and line it with parchment paper. Or, you can brush it with butter and dust it with a little mochiko flour. This keeps the cake from sticking.
2. Mix the Wet Ingredients
In a large mixing bowl, crack the eggs and add the sugar. Whisk until the mixture turns pale and smooth. Pour in the milk and stir until everything blends smoothly.

3. Melt Chocolate and Butter
Using a microwave-safe bowl, melt the butter and chocolate chips together in 15- to 20-second intervals, stirring each time, until completely combined. Let it cool for a minute, then pour into the egg and milk mixture. Mix well.
4. Combine the Dry Ingredients
Grab a large mixing bowl and sift in the mochiko flour, cocoa powder, baking powder, and salt. Stir so everything is evenly mixed.

5. Mix It All Together
Gently stream the liquid mixture into the dry bowl while stirring to combine. Use a whisk to mix until the batter is smooth, silky, and free of lumps.

6. Pour and Smooth the Batter
Pour the batter into your prepared baking tray. Use a skewer or knife to swirl through the batter to remove any air bubbles.
7. Bake to Perfection
Place the tray in the oven and bake for 40 to 45 minutes. You’ll know it’s done when the top is golden brown and the middle only wiggles a tiny bit when you shake the pan.

8. Cool and Slice
Allow the cake to rest in the baking pan for half an hour. Then carefully move it to a wire rack to cool for another hour. To get neat slices, coat your knife with a bit of oil or cover it in plastic wrap to prevent sticking.


Secrets to Success and Expert Tips
- Avoid baking it too long, as this can make the mochi less soft and chewy. Start checking at 40 minutes.
- Let it rest: Cooling helps the cake set and makes slicing easier.
- Use fresh mochiko: Mochiko flour has a long shelf life, but fresh flour gives the best results.
- Mix well: Mochiko can clump, so make sure your batter is smooth.
Assembly and Presentation Tips
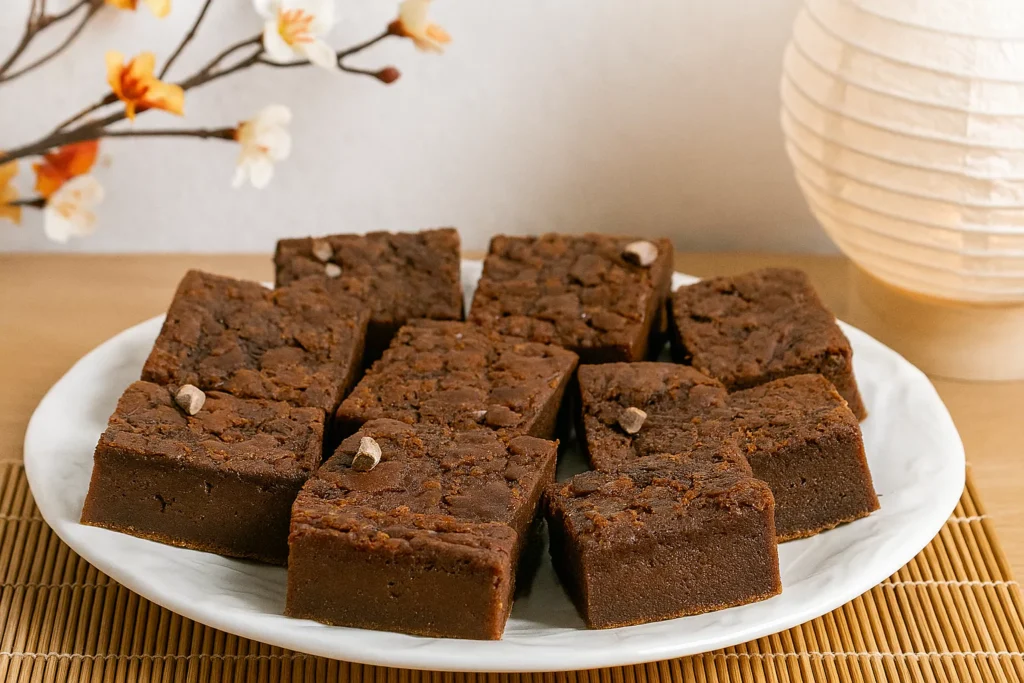
Once the cake is baked and cooled, you can cut it into squares, bars, or diamonds. Serve them on a plate with a light dusting of cocoa powder or powdered sugar for a beautiful look.
Want a more elegant finish? Add a drizzle of melted chocolate on top or sprinkle some edible gold flakes.

Chocolate Butter Mochi Cake @JapanDishes
Hana’s Recipe Tips
Hana, a home baker who grew up in Hawaii, swears by a few extra tricks:
- Using ingredients at room temperature helps them blend easily for a lump-free batter.
- Don’t skip the skewer swirl—it helps pop bubbles and gives a better texture.
- Enhance the taste with a touch of vanilla extract or a bit of espresso powder.
Her final tip: Make this cake the night before serving. The texture becomes even chewier the next day!
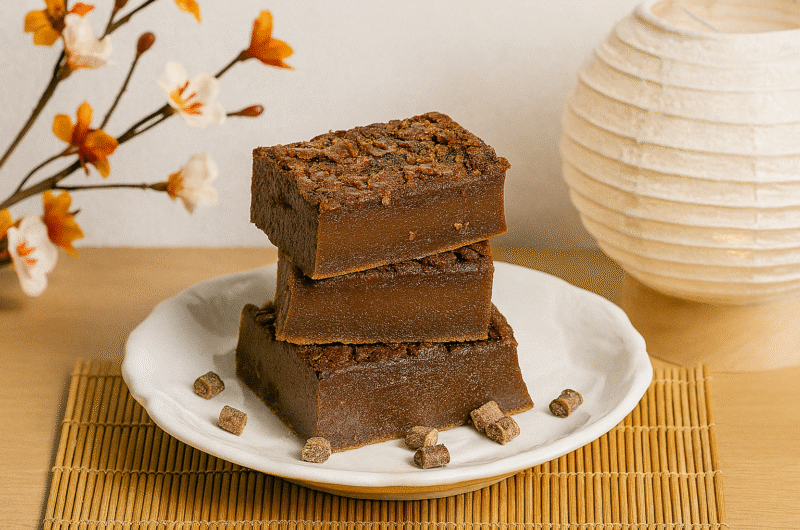
Storage and Make-Ahead Tips
Chocolate butter mochi stores very well. Here’s how to keep it fresh:
- At room temp, this dessert stays fresh in an airtight container for about three days.
- Refrigerator: Store for up to 5 days. Bring to room temperature before eating for the best texture.
- Freezer: Wrap pieces in plastic wrap and freeze for up to 2 months. Thaw and microwave for 10–15 seconds before serving.
To make ahead, bake and cool the cake, then wrap tightly and store as needed. It keeps its soft texture even after freezing.

Chocolate Butter Mochi Cake @JapanDishes
Recipe Variations
Looking to change things up? Try these fun ideas:
- Matcha Butter Mochi: Replace cocoa powder with matcha and skip the melted chocolate.
- Add a few spoonfuls of peanut butter to the batter and gently swirl it in before baking.
- Coconut-Chocolate Twist: Use coconut milk instead of regular milk and sprinkle shredded coconut on top.
- Mini Muffin Version: Bake the batter in muffin tins for single-serve treats (reduce bake time to 25–30 minutes).
Conclusion
Chocolate butter mochi cake is one of those desserts that surprise you—in the best way. It’s soft, chewy, rich, and totally unique. With just a few simple steps and ingredients, you can enjoy this chocolatey treat anytime.
Don’t be afraid to try your own spin. Add nuts, swap the chocolate, or mix in something you love. This cake is flexible and forgiving—just like the best home-baked goodies should be.
If you’re passionate about Japanese food and travel culture, be sure to visit JapanToVisit.com for guides, tips, and authentic experiences from all over Japan.
FAQs
Q: Is chocolate butter mochi gluten-free?
Yes, because it uses sweet rice flour (mochiko), not wheat flour. It’s naturally gluten-free.
Q: Can I make it without eggs?
Yes. Try using flax eggs (1 tablespoon ground flaxseed + 3 tablespoons water = 1 egg) or egg replacers.
Q: What does butter mochi taste like?
This dessert has a chewy texture and a sweet, buttery chocolate flavor—like a cross between mochi and a brownie.
Q: Can I make it less sweet?
Yes, reduce the sugar slightly or use dark chocolate for a less sweet taste.
Q: What’s the best way to reheat it?
Microwave slices for 10–15 seconds to make them soft and warm again.
With these simple steps, you’re ready to create this chewy, chocolatey treat yourself. It’s chewy, chocolatey, and sure to become a favorite in your kitchen.
Chocolate Butter Mochi Cake チョコ餅ケーキ
Course: DessertCuisine: JapaneseDifficulty: Easy12
servings15
minutes45
minutes260
kcalIngredients
2 large eggs (room temperature)
¾ cup sugar
5 tablespoons butter, melted and cooled
1¾ cups milk
¼ cup heavy cream
½ cup semisweet chocolate chips, melted and cooled
2 cups mochiko sweet rice flour
2 tablespoons unsweetened cocoa powder
1 teaspoon baking powder
⅛ teaspoon salt
Directions
- Preheat your oven to 180°C (350°F). Prepare a 9×13-inch baking dish by lining it with parchment paper or greasing it lightly and dusting with mochiko flour.
- In a large bowl, whisk the eggs and sugar together until the mixture becomes light and pale.
- Add the milk and stir until everything is fully blended.
- In a microwave-safe bowl, melt the butter and chocolate chips together in 15-20 second bursts, stirring in between. When the mixture has melted and cooled a bit, combine it with the egg and milk mixture, stirring until fully blended.
- Using a clean bowl, sift the mochiko, cocoa powder, baking powder, and salt to ensure they’re well mixed. Stir until well combined.
- Slowly pour the wet mixture into the dry ingredients, mixing as you go. Mix with a whisk until the batter is completely smooth and free of lumps.
- Pour the batter into your prepared pan. Gently run a skewer or toothpick through the batter to release trapped air.
- Bake for 40 to 45 minutes, until the surface is golden and set, with just a slight wobble in the middle.
- Cool the cake in the pan for half an hour, then move it to a wire rack to rest for one more hour before cutting.
- For neat slices, coat your knife with a bit of oil or cover it with plastic wrap.
Notes
- For a dairy-free version, substitute the milk and cream with coconut milk, and use dairy-free butter and chocolate.
The texture improves overnight—store it tightly covered at room temperature or in the fridge for longer freshness.
This cake freezes well. Just wrap individual slices and store them in the freezer for up to 2 months.