Have you ever wondered why Japanese fried chicken tastes lighter, juicier, and crispier than regular fried chicken? You might think it’s just another fried snack, but there’s something special about Chicken Karaage. This flavorful dish isn’t only about frying—it’s about technique, marinade magic, and the perfect crispy finish. Ready to discover the secrets behind Japan’s favorite chicken bites?
Let’s dive into the world of Chicken Karaage and learn how to make it step by step!
Jump to Recipe Print RecipeWhat Makes Chicken Karaage So Special?
Chicken Karaage stands out because of its deep umami flavor, juicy texture, and crispy, golden crust. Unlike Western-style fried chicken, Karaage uses a soy-based marinade, flour-starch coating, and a double-frying method for extra crunch. It’s also bite-sized and easy to eat, making it great for bento boxes, dinner, or parties.
- Time required: About 1 hour (including marinating)
- Skill level: Beginner-friendly
- Taste: Savory, crispy, and juicy
What is Karaage (Japanese Fried Chicken) 唐揚げ?
Karaage (唐揚げ) is a traditional Japanese method of cooking that involves marinating bite-sized pieces typically chicken before deep-frying them until crisp and flavorful. The name comes from the words “kara” (唐) meaning “China” and “age” (揚げ) meaning “to fry.” It was originally influenced by Chinese-style frying but developed into a uniquely Japanese dish.
Chicken Karaage uses boneless, skin-on chicken thighs soaked in a flavorful marinade of soy sauce, sake, garlic, and ginger. After marinating, it’s coated in a mix of flour and starch, then fried twice to achieve that irresistible crispy texture.

Japanese Fried Chicken 唐揚げ @JapanDishes
What Is Japanese Mayonnaise (Kewpie) マヨネーズ?
No Chicken Karaage is complete without a dollop of Kewpie mayonnaise, Japan’s famous rich and creamy mayo. It’s made with egg yolks, rice vinegar, and a hint of umami, giving it a deeper taste than regular mayonnaise. Karaage dipped in Kewpie mayo? Absolute perfection.
 マヨネーズ @JapanDishes")
Japanese Mayonnaise (Kewpie) マヨネーズ @JapanDishes
Want to make it yourself? Check out our easy guide to making Japanese mayonnaise:
👉 Your Easy Guide to Making Japanese Mayonnaise
Essential Ingredients for Chicken Karaage
Here’s what you’ll need to make authentic Chicken Karaage:
Main Ingredients
- 1½ lb boneless, skin-on chicken thighs – Juicy, tender, and perfect for frying
- ½ tsp kosher salt – Enhances flavor
- ⅛ tsp black pepper – Adds mild heat
Marinade
- ½ tsp grated ginger (with juice) – Brings warmth and freshness
- 1 clove garlic (minced) – Adds depth
- ½–1 Tbsp soy sauce – Rich umami base
- ½ Tbsp sake (or substitute with dry sherry or rice wine) – Helps soften the chicken and adds subtle depth to the flavor.
- ½ tsp toasted sesame oil – A nutty aroma that enhances taste
For Frying
- 3–4 cups neutral oil – Choose canola or vegetable oil
- 2 Tbsp all-purpose flour – Helps create a crispy crust
- 2 Tbsp potato starch or cornstarch – Creates a thin, crispy coating that gives the chicken its signature crunch.
For Serving (Optional)
- Lemon wedges – For a citrusy touch
- Kewpie mayonnaise – Creamy dipping
- Shichimi togarashi (Japanese seven spice) – A spicy kick

Ingredients for Chicken Karaage @JapanDishes
Substitutes
- You can use chicken breast instead of thighs (though it’s drier).
- If you don’t have sake, just skip it or use dry sherry.
- Cornstarch works well if you can’t find potato starch.
Step-by-Step Instructions
1. Prepare the Chicken
Cut the chicken thighs into 2-inch (5-cm) chunks. Sprinkle the chicken with a little salt and pepper, then let it rest while you prepare the marinade.


2. Make the Marinade
Combine the grated ginger (including its juice), finely chopped garlic, soy sauce, sake, and sesame oil in a large mixing bowl. Stir well.

3. Marinate the Chicken
Add the chicken to the marinade. Mix everything with your hands so the flavor coats each piece. Cover and refrigerate for 30 minutes.

4. Heat the Oil
Pour about 3–4 cups of oil into a deep pan. You’ll want at least 1 to 1.5 inches of oil depth. Slowly heat the oil to 325ºF (160ºC).
5. Coat the Chicken
In two shallow trays, place flour in one and starch in the other. Coat each piece of chicken in flour first, then dredge in potato starch. Shake off any excess.


6. First Fry
Gently place 3 to 5 chicken pieces in the hot oil. Don’t overcrowd the pot. Fry for 90 seconds or until light golden. Lift the chicken out of the oil and transfer it to a wire rack to let the excess oil drip off.


7. Second Fry
Increase the oil temperature to 350ºF (180ºC). Return the pre-fried chicken to the oil for another 45 seconds to crisp up the outside. Remove and let it rest.


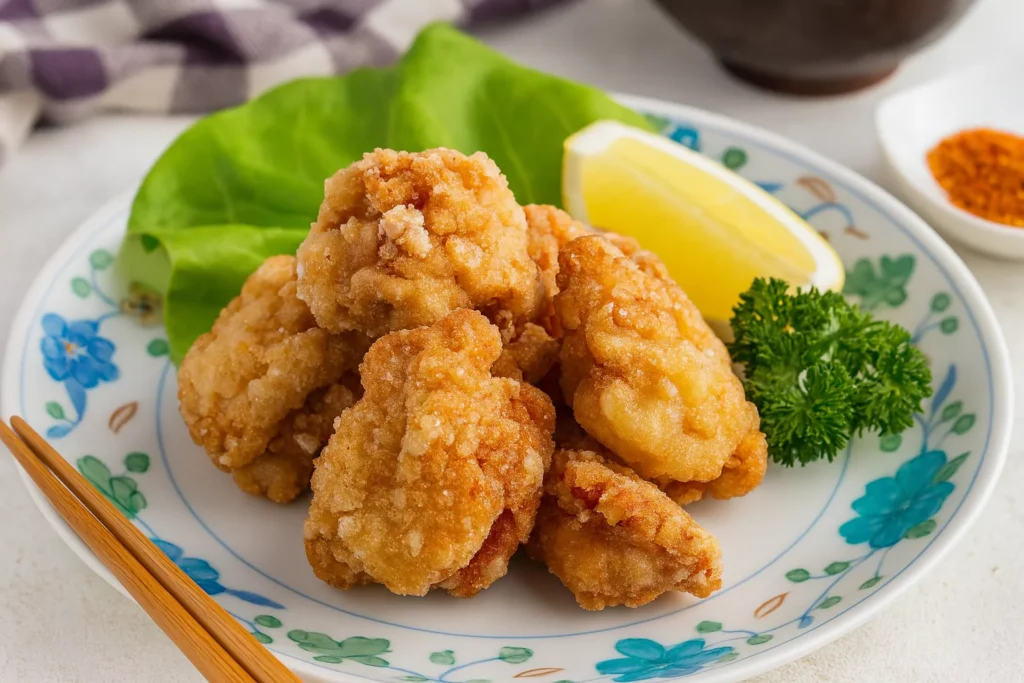
8. Serve
Arrange on a plate with lemon wedges and a side of Kewpie mayo. Sprinkle with shichimi togarashi if you want some spice.

Secrets to Success
Want Karaage that’s crispy outside and juicy inside? These secrets will help:
- Marinate long enough – At least 30 minutes to let flavors soak in
- Double-fry – This ensures ultimate crunch
- Don’t skip the starch – It’s what gives Karaage its signature crispy crust
- Avoid adding too many pieces at once—this can drop the oil temperature and cause the chicken to turn out soggy instead of crispy.
Expert Tips
- No thermometer? Use a wooden chopstick if bubbles form around it when dipped into the oil, it’s hot enough for frying. If bubbles form, it’s ready.
- Use skin-on thighs: The skin crisps up beautifully and locks in moisture.
- Let it rest: The resting time between the first and second fry helps the chicken stay juicy.
Assembly and Presentation
Once fried, place the chicken on a serving platter or bento box. Arrange lemon wedges around the pieces. Serve Kewpie mayo in a small dipping dish. A sprinkle of shichimi togarashi adds color and flair.
Hana’s Recipe Tips
Our team member Hana swears by these tips:
- A ceramic grater works best for extracting plenty of juice from fresh ginger.
- Placing the chicken in the fridge briefly before the second fry helps boost its crispiness.
- Don’t skip the Kewpie mayo—it’s a Karaage must-have!

Storage and Make-Ahead Tips
- Storage Tip: Keep any leftover chicken in a sealed container in the refrigerator and enjoy within 3 days.
- Reheating: Reheat in an oven at 375ºF (190ºC) for 10–15 minutes or in an air fryer for extra crispness.
- Freezing: Freeze uncooked, marinated chicken for up to 1 month. Thaw in fridge before coating and frying.
Recipe Variations
Want to switch things up?
- Spicy Karaage: Add a little chili paste or shichimi togarashi to the marinade.
- Yuzu Karaage: Use yuzu juice instead of lemon for a citrusy twist.
- Karaage Don: Serve the fried chicken over a rice bowl with soy glaze and scallions.
Conclusion
Chicken Karaage is more than just fried chicken—it’s a celebration of flavor and texture. It’s simple enough for a weeknight meal and delicious enough for a party treat. Try it once, and you’ll find yourself making it again and again.
Whether you enjoy it with rice, in a bento box, or as a snack with beer, Chicken Karaage always satisfies.
FAQs About Chicken Karaage
Q1: Is Chicken Karaage healthy?
While it’s fried, using skin-on thighs and moderate oil makes it healthier than deep-fried fast food. Pair with veggies or a salad for balance.
Q2: Can I make Chicken Karaage in an air fryer?
Yes! Spray coated chicken with oil and cook at 375ºF (190ºC) for about 15 minutes, flipping halfway.
Q3: What oil is best for frying Karaage?
Use neutral oils like canola, peanut, or sunflower oil. Avoid olive oil.
Q4: Why do you fry twice?
Double-frying helps remove moisture and gives you that perfect crispy shell.
Q5: Can I use chicken breast instead?
Yes, but it may turn out drier. Thighs are juicier and more forgiving.
Ready to give Chicken Karaage a try? This recipe is a perfect starting point for mastering Japanese comfort food at home. Happy cooking!
Explore More Japanese Cuisine and Culture:
For more travel stories, food inspiration, and authentic Japanese experiences, visit Japan to Visit.

Karaage (Japanese Fried Chicken) 唐揚げ
Course: Main CoursesCuisine: JapaneseDifficulty: Easy4
servings40
minutes15
minutes320
kcalIngredients
- Main
1½ lb boneless chicken thighs with skin (cut into 2-inch pieces)
½ tsp kosher salt
⅛ tsp black pepper
- Marinade
½ tsp freshly grated ginger (with juice)
1 garlic clove, finely minced
½ to 1 Tbsp soy sauce
½ Tbsp sake (or dry sherry as an alternative)
½ tsp toasted sesame oil
- For Frying
3–4 cups neutral oil (vegetable or canola recommended)
2 Tbsp potato starch or cornstarch
2 Tbsp all-purpose flour
- For Serving (Optional)
Lemon wedges
Japanese Kewpie mayonnaise
Shichimi togarashi (Japanese seven spice) (Optional)
Directions
- Prepare the Chicken
Trim and cut the chicken thighs into evenly sized chunks (about 2 inches each). Sprinkle with salt and black pepper, then set aside. - Mix the Marinade
In a mixing bowl, stir together the grated ginger (including the juice), chopped garlic, soy sauce, sake, and sesame oil until well blended. Stir well. - Marinate the Chicken
Add the chicken pieces to the marinade and mix thoroughly to ensure each one is evenly coated. Cover the bowl and let it chill in the refrigerator for a minimum of 30 minutes. - Heat the Frying Oil
Fill a deep, heavy-bottomed pot with about 3 to 4 cups of neutral oil. Heat the oil slowly to around 325°F (160°C) over medium heat. - Coat the Chicken
Set out two shallow bowls or trays—one with flour, the other with starch. Lightly dust each piece of chicken with flour, tap off any extra, then roll it in starch for a crisp outer layer. - First Fry
Carefully lower a few chicken pieces into the hot oil without overcrowding. Fry for about 90 seconds, until pale golden. Remove and drain on a wire rack. - Second Fry
Raise the oil temperature to 350°F (180°C). Re-fry the chicken pieces for about 45 seconds until golden brown and crisp. Drain again on a wire rack. - Serve
Plate the Karaage with lemon wedges. Serve with Kewpie mayo for dipping and a dash of shichimi togarashi if desired.
Notes
- Make sure not to overcrowd your pot during frying to keep oil temperature consistent.
Double-frying helps get that iconic crunch while keeping the inside juicy.
Refrigerate any leftovers in an airtight container and enjoy within three days. Reheat in an oven or air fryer for best texture.