Grilled Rice Balls, known in Japan as Yaki Onigiri (焼きおにぎり), are a delicious answer to that question. They’re crispy on the outside, warm and soft inside, and brushed with a sweet-savory soy glaze that makes every bite unforgettable. Whether you’re enjoying them fresh off the pan or packing them for a picnic, these rice balls show just how satisfying simple Japanese comfort food can be.
In this article, you’ll learn everything about making the perfect Grilled Rice Ball 焼きおにぎり Recipe — from the ingredients and step-by-step instructions to tips for shaping, grilling, and storing them. Let’s get cooking!
What Makes This Recipe Special
Grilled Rice Balls are one of Japan’s most beloved snacks. While traditional onigiri are plain rice balls filled with tuna, salmon, or pickled plum, Yaki Onigiri are all about texture and flavor. Once grilled, the outer layer becomes golden brown and crisp, while the inside stays tender and fluffy.
The magic comes from the glaze — a blend of soy sauce, mirin, sesame oil, and sugar — which caramelizes as it cooks, giving the rice balls that iconic smoky aroma.
Time Requirement: About 25 minutes from start to finish
Difficulty Level: Easy to moderate — perfect for beginners with a little patience
")
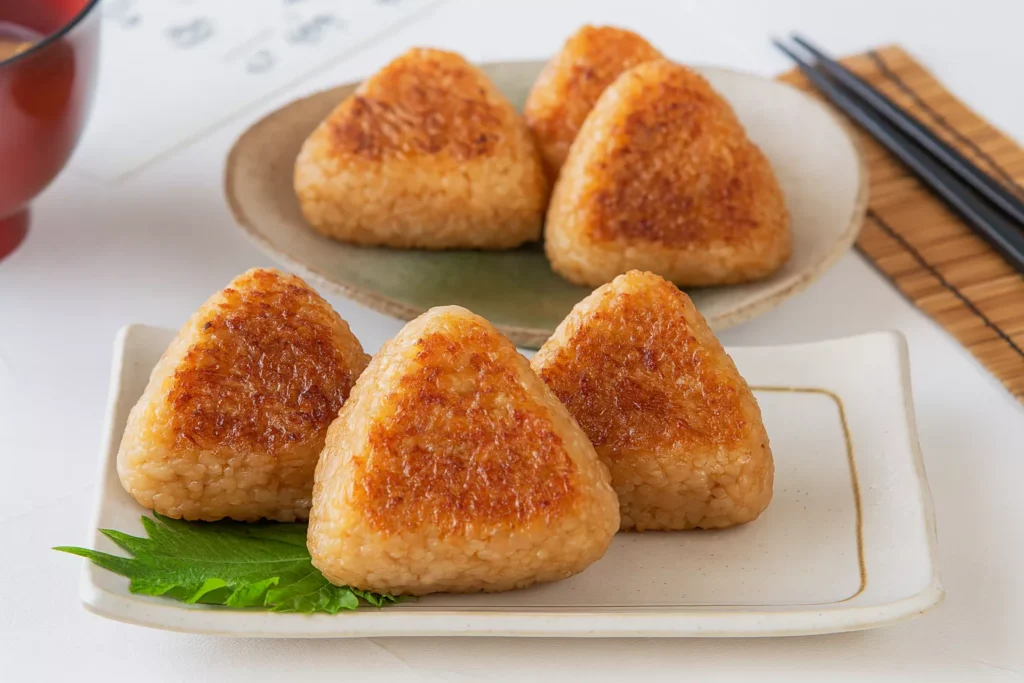
Yaki Onigiri (焼きおにぎり) @JapanDishes
What Is Grilled Rice Ball 焼きおにぎり?
Yaki Onigiri literally means “grilled rice ball.” It’s made by shaping warm rice into a firm triangle or round, brushing it with a light sauce, and grilling it until golden brown. You’ll often find these at Japanese izakaya (pubs) or even sold in convenience stores.
They’re typically served plain or sometimes brushed with soy-based sauces, miso glaze, or even wrapped in seaweed after grilling. Their crispy shell and soft inside make them an addictive snack or a light meal.
Essential Ingredients
Let’s look at what you’ll need for this Grilled Rice Ball 焼きおにぎり Recipe, and why each ingredient plays a role.
Ingredients
- Freshly cooked rice (1 go / about 150 g)
Use short-grain Japanese rice (like sushi rice). Its sticky texture helps the rice ball hold its shape. Avoid long-grain or basmati rice — they fall apart easily. - Soy sauce (1 tablespoon)
Adds umami and saltiness while giving the rice its signature caramelized color. - Hon Mirin (2 teaspoons)
A sweet rice wine that balances the saltiness of soy sauce and helps the glaze become glossy. - Japanese soup stock (dashi granules, 1 teaspoon)
Infuses deep savory flavor into the rice. You can substitute with a pinch of salt and a dash of soy if you don’t have dashi. - Sesame oil (1 teaspoon for sauce + ½ to 1 teaspoon for brushing)
Enhances aroma and helps the rice brown beautifully. - Sugar (½ teaspoon)
Balances the saltiness and aids in caramelization.
Ingredient Notes and Substitutions
- Rice substitute: If Japanese rice isn’t available, try Calrose rice — it’s similar in stickiness and flavor.
- Vegan option: Use kombu dashi (kelp stock) instead of bonito-based dashi.
- Extra glaze idea: Add a small spoon of miso paste for a richer, deeper taste.
Step-by-Step Instructions
Now let’s make your kitchen smell like a Japanese grill!
Step 1: Mix the Seasoning
While your rice is still hot, combine soy sauce, mirin, dashi granules, sesame oil, and sugar in a bowl. Quickly mix the seasoning into the rice using a rice paddle or wooden spoon. The heat helps the flavors absorb evenly.
")
Tip: Work gently — you want the rice grains to stay intact. Over-mixing can make it mushy.
Step 2: Shape the Rice Balls
Before the rice cools completely, divide it into four equal portions (about 90 grams each).
Wet your hands lightly or brush them with a thin layer of sesame oil to prevent sticking. Shape each portion into a firm triangle by pressing gently but evenly from the sides and top.
")
Tip: Don’t squeeze too hard — that can break the rice. You just need it to hold together.
Step 3: Flatten for Even Grilling
Place the rice balls on a damp cutting board. Put another cutting board or flat plate on top and press gently to make them evenly thick.
Then, lightly brush your hands with sesame oil and reshape the onigiri, smoothing the surface so it’s ready for grilling.
")
Step 4: Grill the Onigiri
Heat a non-stick frying pan or grill pan over medium-high heat. Place the rice balls in the pan and cook without oil for about 4 to 5 minutes per side, or until they turn golden brown and crisp.
")
The goal is to create a crust that holds the shape without burning.
Step 5: Flip and Cook Evenly
Gently flip the rice balls using a spatula or chopsticks. Cook the other side for another 4 to 5 minutes until it develops a beautiful brown crust. Rotate them slightly to brown the edges too.
")
Step 6: Add Final Touches
Brush a bit more soy sauce or sesame oil mixture on the surface, then grill briefly on each side again to deepen the flavor and color.
You’ll know they’re perfect when the air fills with a sweet, toasty aroma — crispy outside, soft inside.
")
Grilled Rice Ball 焼きおにぎり
Secrets to Success and Expert Tips
- Use freshly cooked rice: Warm rice binds better and shapes easily. Cold rice crumbles.
- Don’t rush the grill: Let each side brown slowly. Patience creates that ideal crisp crust.
- Avoid too much sauce at first: Too much liquid can cause the rice to fall apart. Brush lightly.
- Choose a flat, heavy pan: It helps the rice cook evenly and get that signature golden color.
- For outdoor grilling: Wrap the rice balls lightly in foil and grill over charcoal for a smoky, traditional flavor.
Assembly and Presentation
Once your Grilled Rice Balls 焼きおにぎり are cooked, it’s time to serve them beautifully.
Plating Ideas
- Arrange the rice balls on a Japanese plate or wooden board.
- Add a small dish of soy sauce or pickled vegetables (tsukemono) on the side.
- Sprinkle with toasted sesame seeds or chopped green onions for color.
- For a traditional touch, wrap a small piece of nori (seaweed) around the base — it adds texture and makes them easier to hold.
Hana’s Recipe Tips
Hana’s secret to the best Grilled Rice Ball 焼きおにぎり Recipe is in the balance of heat and glaze. Grill the rice balls first without sauce to build a crust, then brush them with soy sauce or miso glaze for the final minutes. This keeps them crisp, not soggy.
If you’re serving these at a party, prepare them ahead of time and reheat in the oven or toaster. They’ll still taste freshly made!
Storage and Make-Ahead Tips
- Room temperature: If serving within a few hours, wrap the grilled rice balls in parchment paper or plastic wrap and keep them at room temperature.
- Refrigeration: For longer storage (up to 2 days), store in an airtight container. Reheat in a pan or oven until warm and crisp.
- Freezing: Wrap each rice ball individually in plastic wrap, then store in a freezer bag for up to a month. Thaw at room temperature and reheat gently.
- Reheating tip: Avoid microwaving directly — it makes the rice chewy. Instead, reheat on a dry pan or in the oven for the best texture.
Recipe Variations
There are so many fun ways to make Grilled Rice Balls your own!
- Miso Yaki Onigiri: Mix a spoonful of miso paste with mirin and sugar, then brush it on before grilling for a deeper umami taste.
- Cheese Onigiri: Add a small cube of cheese in the center before shaping. When grilled, it melts beautifully inside.
- Seaweed wrap: Wrap the rice ball with nori after grilling for extra flavor and grip.
- Spicy version: Add chili flakes or a dab of gochujang to the glaze for a kick.
- Filled Onigiri: Add fillings like grilled salmon, pickled plum, or tuna mayo inside before shaping, then grill as usual.
If you love traditional Japanese comfort dishes, you might also enjoy our Satsumaimo Stir-Fry (Sweet Potato) 和風さつまいも炒め a light and healthy sweet potato side dish that pairs beautifully with grilled rice balls.
For a cozy Japanese meal, serve them alongside Pork Mince and Tofu Sukiyaki 豚ひき肉と豆腐のすき焼き the savory broth perfectly complements the smoky rice crust of your onigiri.
 和風さつまいも炒め")

Health Benefits
Grilled Rice Balls are a wholesome, light, and satisfying snack. They’re:
- Made from simple ingredients with no deep frying
- Naturally gluten-free (when using gluten-free soy sauce)
- A good source of energy and carbohydrates
- Easy to digest and can be customized with healthy toppings like seaweed or vegetables
They make a great lunchbox addition or afternoon snack when you need quick comfort food.
Conclusion
Grilled Rice Balls (焼きおにぎり) prove that even the simplest ingredients — rice, soy sauce, and a bit of care — can turn into something extraordinary.
With just a few minutes of grilling, you get a snack that’s crispy, aromatic, and deeply comforting. Don’t be afraid to experiment: try different sauces, fillings, or even outdoor grilling for that authentic Japanese flavor.
Once you master the technique, Yaki Onigiri will become one of your favorite go-to recipes for any occasion.
FAQs About Grilled Rice Ball 焼きおにぎり Recipe
Q1. Can I use leftover rice for grilled rice balls?
Yes, but it’s best to warm it slightly before shaping. Cold rice is harder to form and may break apart.
Q2. Do I need a grill pan?
No, a regular non-stick frying pan works fine. Just make sure it’s clean and hot before placing the rice balls.
Q3. Can I make them without soy sauce?
You can season with salt or use miso paste mixed with a little water and sugar for a saltier, earthy flavor.
Q4. How can I make them crispier?
Let them cook undisturbed for a few minutes before flipping. A light coating of sesame oil also helps create a golden crust.
Q5. Are grilled rice balls healthy?
Yes! They’re simple, low in fat, and made with wholesome rice. Using sesame oil and soy sauce in moderation keeps them nutritious.
Q6. What’s the best rice for Yaki Onigiri?
Use Japanese short-grain or sushi rice — it’s sticky enough to hold its shape without falling apart.
In short: With its crispy shell, fluffy center, and smoky-sweet glaze, Grilled Rice Ball (焼きおにぎり) is a timeless Japanese comfort food that’s easy, delicious, and endlessly adaptable. Try it once — and you’ll find yourself making it again and again.
And if you’re planning a trip to Japan, check out Welcome Suica Mobile & JR East Reservations to make your travels smoother with easy train passes and bookings. It’s a helpful travel tip that perfectly complements the Japanese lifestyle behind this dish!

Yaki Onigiri (焼きおにぎり): Grilled Rice Ball
Course: AppetizersCuisine: JapaneseDifficulty: Easy4
servings10
minutes10
minutes180
kcalThese crispy, golden Japanese grilled rice balls — known as Yaki Onigiri (焼きおにぎり) — are coated in a savory soy glaze, grilled until lightly charred on the outside and soft inside. Perfect for snacks, lunch boxes, or pairing with soups and side dishes.
Ingredients
1 go freshly cooked short-grain rice (about 150 g)
1 tablespoon soy sauce
2 teaspoons Hon Mirin
1 teaspoon Japanese dashi granules
1 teaspoon sesame oil (plus extra for brushing)
½ teaspoon sugar
Directions
- Season the rice
In a bowl, mix hot, freshly cooked rice with soy sauce, mirin, dashi granules, sesame oil, and sugar. Gently fold the rice so it absorbs the flavors evenly. - Shape the rice balls
While still warm, divide the rice into four portions. Lightly wet or oil your hands and form firm triangles or rounds. Avoid pressing too hard — just enough to hold the shape. - Flatten and smooth
Place the onigiri on a damp cutting board. Press gently with another flat surface to even the thickness. Smooth the edges with your hands and lightly brush with sesame oil. - Grill until golden
Heat a non-stick pan or grill over medium-high heat. Place the rice balls directly on the surface and cook for 4–5 minutes per side until golden and crisp. - Flip and glaze
Turn over and grill the other side until browned. Brush lightly with soy sauce or sesame oil and grill again briefly to caramelize the surface. - Serve and enjoy
Transfer to a plate, let cool slightly, and enjoy the contrast of the crunchy exterior and tender interior.
Notes
- ✪ Use freshly cooked Japanese short-grain rice — cold rice breaks apart easily.
✪ Brush glaze sparingly; too much can make the rice soggy.
✪ For a smoky, traditional flavor, grill over charcoal.
✪ Serve with miso soup or pickled vegetables for a balanced meal.