Have you ever wondered why these simple little rice balls on a stick have been loved in Japan for hundreds of years? People often think dango is hard to make, or that it needs special tools, but the truth is that you can prepare it at home with only a few ingredients and a short amount of time. This guide will show you how simple and fun it can be.
Overview
Dango is one of Japan’s most charming traditional sweets. It looks small and cute, but it carries deep meaning in Japanese culture. These chewy rice dumplings are soft, colorful, and often enjoyed during festivals, tea ceremonies, and family gatherings.
This recipe is simple, quick, and perfect for beginners. You only need about 30 minutes to make it from start to finish. There is no complicated cooking technique. Even if you are new to Japanese desserts, you can prepare delicious dango with ease.

What is Dango 団子?
Dango is a small round dumpling made from rice flour. It is usually skewered on wooden sticks and served in sets of three or four. The texture is chewy and soft. Some people compare it to mochi, but dango is firmer and easier to shape. In Japan, there are many types, such as mitarashi dango, hanami dango, and matcha dango. Each style has its own flavor and color, but the base dough stays simple. This makes dango a perfect dessert to customize.
Essential Ingredients
Key Ingredients (材料)
Easy Dango 団子These simple ingredients create the soft, chewy, and colorful texture of traditional Japanese dango. Each card explains what the ingredient does and how you can substitute it if needed.

Step-by-Step Instructions
Follow these steps to make perfect dango every time.
Step 1: Prepare the Dough
Place the joshinko and sugar into a large mixing bowl. Pour the boiling water little by little. Mix with a spoon at first because it is very hot. When the mixture becomes warm enough to handle, knead with your hands.

Keep kneading until the dough is smooth, soft, and feels like an earlobe. This comparison is common in Japanese cooking and helps you know the right texture. If the dough feels too dry, add a small spoon of hot water. If it feels too wet, sprinkle a little more joshinko.

Divide the dough into three equal parts.

Step 2: Add the Colors
You now have three dough portions:
- Plain dough
- Green dough with matcha powder
- Pink dough with food coloring
Knead each portion until the colors are evenly mixed. The colors should look soft, not too strong.

Step 3: Shape the Balls
From the plain dough and pink dough, form small balls about the size of a marble. The goal is to make 24 equal balls. This gives you eight skewers with three colors each.
Try to keep the size even so they cook at the same rate.

Step 4: Boil the Dango
Bring a pot of water to a boil. Carefully drop the dango balls into the water. They will sink at first. Let them boil for about five minutes or until they rise to the surface. Once they float, cook for one more minute.

Use a spoon to transfer them into a bowl of cold water. This stops the cooking and helps set the texture. After a few minutes, drain them well.

Secrets to Success and Expert Tips
These simple but important tips will help you make soft, smooth, and perfectly chewy dango every time:
-
♥
Knead until the dough feels like an earlobe
The classic Japanese guideline ensures the dough is soft but not sticky. This texture gives dango its signature chew. -
♥
Add water slowly
Pour hot water little by little to avoid a dough that becomes too wet. It’s easier to add more water than to fix soft, sticky dough. -
♥
Keep the ball sizes even
If every ball is the same size, they cook evenly and look neater on the skewer. Uneven pieces can cook at different speeds. -
♥
Boil the dango until they float
Floating means the center is cooked. Leaving them in boiling water for one more minute ensures a chewy but fully cooked texture. -
♥
Cool them in cold water
This stops the cooking immediately and helps the surface stay smooth and bouncy. It also prevents the dango from sticking together.
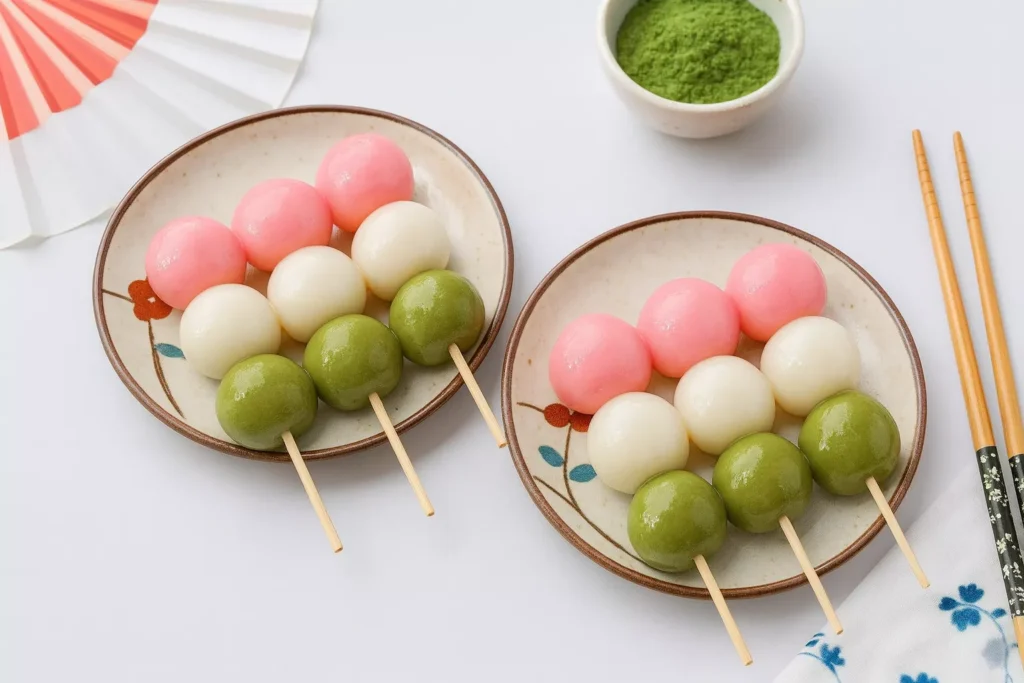
Assembly
Once the dango balls are cooled and drained, it is time to assemble. Take wooden skewers and thread one pink ball, one white ball, and one green ball. This creates the classic hanami dango look. Make sure to press gently so you do not break them.

Presentation Tips
Dango looks beautiful when arranged on a simple plate or Japanese-style dish. Try these ideas:
- Place the skewers tightly together for an elegant look.
- Brush them lightly with sugar syrup for shine.
- Serve them with a small cup of green tea.
- Add a sprinkle of matcha on the plate for contrast.

Hana’s Recipe Tips
Here are simple ways to make your dango even better:
- Use warm hands when rolling the dough. It helps keep the texture soft.
- Make all the balls the same size so they look neat.
- Do not rush the boiling step. Cooking them too fast makes them crack.
- If you want stronger color, add a little more matcha or food coloring before kneading.
These small details help create a beautiful final result.
Storage and Make-Ahead Tips
Dango tastes best on the day it is made, but you can store it:
- At room temperature: Up to 6 hours
- In the refrigerator: Up to 2 days, in an airtight container
- Do not freeze: Freezing changes the texture and makes them tough
If refrigerated, the texture may harden. To soften, warm the dango for a few seconds in the microwave with a damp towel on top.
If you want to prepare ahead:
- Mix and divide the dough early.
- Shape the balls and keep them covered until cooking.
- Boil them right before serving for the best texture.

Recipe Variations
Dango is very flexible, and you can change colors, flavors, or textures to match what you like or what you have at home. Here are some fun ways to customize your Easy Dango 団子:
Try New Flavors
Mix different powders into the dough to create new dango flavors:
- Cocoa powder for chocolate dango
- Black sesame powder for a nutty taste
- Strawberry powder for a fruity twist
Play With Natural Colors
If you prefer natural coloring, use gentle powders instead of food dyes:
- Beetroot powder for soft pink
- Matcha or green tea powder for green
- Purple sweet potato powder for lavender
Change the Toppings
Add simple toppings to give your dango more flavor:
- Sweet soy glaze (mitarashi style)
- Anko (sweet red bean paste)
- Kinako (roasted soybean flour)
Try New Serving Styles
Serve your dango in different ways to match the season or occasion:
- Make seasonal color themes for holidays
- Serve unskewered in a small dessert bowl
- Coat in syrup for an extra glossy finish
Related Recipe You Will Love
If you enjoy making Easy Dango, you might also want to explore another classic Japanese flavor. Check out this detailed guide on Mitarashi Dango, a delicious version coated with a sweet soy glaze. You can find the full recipe here: Mitarashi Dango.

Conclusion
Making dango at home is easy, fun, and rewarding. With just a few ingredients, you can enjoy a classic Japanese sweet that looks beautiful and tastes delicious. Once you learn the basic method, you can experiment with colors, flavors, and toppings. Try different combinations and enjoy making your own style of dango.
FAQs
1. What does dango taste like?
Dango has a mild sweetness and a chewy bite. It can take on many flavors depending on the toppings you add.
2. Is dango healthy?
Yes. Dango is made from rice flour and contains no oil. It is light and simple, making it a good snack.
3. Can I use glutinous rice flour instead?
You can, but the texture will be softer and more mochi-like. Using joshinko gives the classic firm chew.
4. How do I keep dango soft?
Avoid storing it uncovered. Keep it in a container and, if it hardens, warm it slightly with a damp cloth.
5. Can I make the dango bigger?
Yes, but larger balls take longer to cook. Make sure they float fully before removing them.
6. Why did my dango crack?
This happens when the dough is too dry. Add a little warm water and knead again.
7. How many skewers does this recipe make?
You will get about eight skewers with three balls each.

How to make Easy Dango Recipe 団子
Course: DessertCuisine: JapaneseDifficulty: Easy8 skewers (24 dango balls)
servings10
minutes5
minutes120
kcalA simple and beginner-friendly Japanese sweet made from rice flour. These soft, chewy dumplings are shaped into colorful balls, boiled, cooled, and served on skewers. Perfect for snacks, tea time, or Japanese dessert lovers.
Ingredients
220 g joshinko (non-glutinous rice flour)
40 g caster sugar
150 ml boiling water
1 g matcha powder
Red food coloring (a few drops)
Hot water for boiling
Cold water for cooling
Directions
- Add joshinko and sugar to a mixing bowl. Slowly pour in the boiling water while stirring. When cool enough to touch, knead until the dough is smooth and soft like an earlobe.
- Divide the dough into three equal portions. Leave one plain. Mix matcha powder into the second portion to make green dough. Add a little red food coloring into the third portion to create pink dough.
- Roll each portion into small balls, aiming for 24 equal pieces. Keep them the same size for even cooking.
- Bring a pot of water to a boil. Add the dango balls and cook for about 5 minutes. When the balls float to the surface, boil for one more minute.
- Transfer the cooked dango into cold water to stop cooking. Let them cool for a few minutes, then drain well.
- Thread one pink, one white, and one green dango onto each skewer to make traditional tri-color dango.
Notes
- ✪ If the dough cracks while shaping, add a small splash of warm water and knead again.
✪ If the dough feels sticky, dust your hands with a bit of joshinko.
✪ Boiling water must be fully bubbling before adding the dango; this helps keep their shape smooth.
✪ Cooling the dango in cold water helps set the chewy texture.
✪ Best eaten the same day. If storing, keep in an airtight container in the refrigerator and microwave briefly to soften.
Did you make this recipe?
Tag @jp.dishes on Instagram so we can see your delicious creation!