Have you ever wondered what makes Japanese izakayas so irresistible? 🍣✨ Could it be their secret weapon—Hamachi Kama?
Start by posing this intriguing question to grab attention. Explain how Hamachi Kama (grilled yellowtail collar) is a hidden gem in Japanese cuisine, loved for its rich flavor and melt-in-your-mouth texture. Mention that it’s surprisingly simple to make at home, even if you’re new to cooking seafood. This introduction should evoke curiosity and set the stage for the reader to dive into the recipe. If you’re looking for more Japanese-inspired dishes, check out this guide on how to make Mille-Feuille Nabe . It’s another delicious way to explore authentic flavors!
🌸Table of Contents
Overview
Explain what makes Hamachi Kama special:
- Why it’s special: The collar of the fish is packed with tender meat, fat, and flavor—perfect for grilling! 🐟🔥
- This Hamachi Kama recipe is perfect for busy weeknights or last-minute dinner plans! 🕒 All you need is 10 minutes to prep —just a quick rinse, pat dry, and seasoning—and 15 minutes to cook on the grill or stovetop. From start to finish, you’ll have a delicious meal ready in under 25 minutes total . That’s faster than waiting for takeout! ⏰
- Difficulty level: Beginner-friendly! No fancy tools or techniques required. 🎉
Add a sentence about how this dish is both healthy and indulgent, making it perfect for weeknight dinners or dinner parties.

Essential Ingredients
What You’ll Need and Why It Matters
Let’s break down the essential ingredients for this recipe and uncover why each one plays a vital role in creating the mouthwatering flavors and textures that make Hamachi Kama so irresistible. 🌟
- Hamachi Kama (Yellowtail Collar): The star of the show! 🌟 These fatty collars are full of flavor and cook quickly on the grill.
- Substitution: If you can’t find yellowtail, try other fish collars like salmon or mackerel. 🐟
- Kosher Salt: Enhances the natural umami of the fish without overpowering it. ✨
- Tip: Use Diamond Crystal brand for consistent results. Skip the salt if you plan to dip the fish in yuzu-flavored soy sauce.
- Soy Sauce & Yuzu Juice: For a zesty dipping sauce that complements the richness of the fish. 🍋🍶
- Variation: Substitute lime juice if yuzu isn’t available.
- Lemon Wedges: Optional, but adds a refreshing citrusy kick. 🍋
Mention that these ingredients are simple yet transformative when combined properly.
Step-by-Step Instructions
Provide detailed instructions with tips for success:
- Prep the Hamachi Kama:
- Pat the collars dry with paper towels to ensure crispy skin. 🧻
- Sprinkle kosher salt generously on both sides. After seasoning the Hamachi Kama with salt, let it rest for about 5 minutes. This short wait allows the salt to penetrate the surface and pull out excess moisture, ensuring the skin turns wonderfully crispy when grilled. 🕒✨
- Preheat Your Grill or Pan:
- Heat your grill or cast-iron skillet over medium-high heat. 🔥
- Lightly oil the surface to prevent sticking.
- Grill the Collars:
- Place the collars skin-side down first. Cook for 7–8 minutes until golden brown and crispy. Carefully turn the Hamachi Kama over and let it cook for another 5–7 minutes, ensuring it becomes evenly golden and deliciously crispy. ✨ This ensures the other side becomes perfectly golden and crispy. 🍳✨
- Pro Tip: Don’t move the fish too much while grilling—it helps achieve that perfect char!
- Prepare the Dipping Sauce:
- In a small bowl, stir together soy sauce and yuzu juice until fully blended. This quick step creates a tangy, umami-rich dipping sauce that beautifully enhances the rich, buttery flavors of Hamachi Kama. 🍋✨ Adjust proportions to taste. 🥄
- Serve Immediately:
- Garnish with lemon wedges and serve piping hot. 🍽️

Assembly
Guide readers on how to present the dish beautifully:
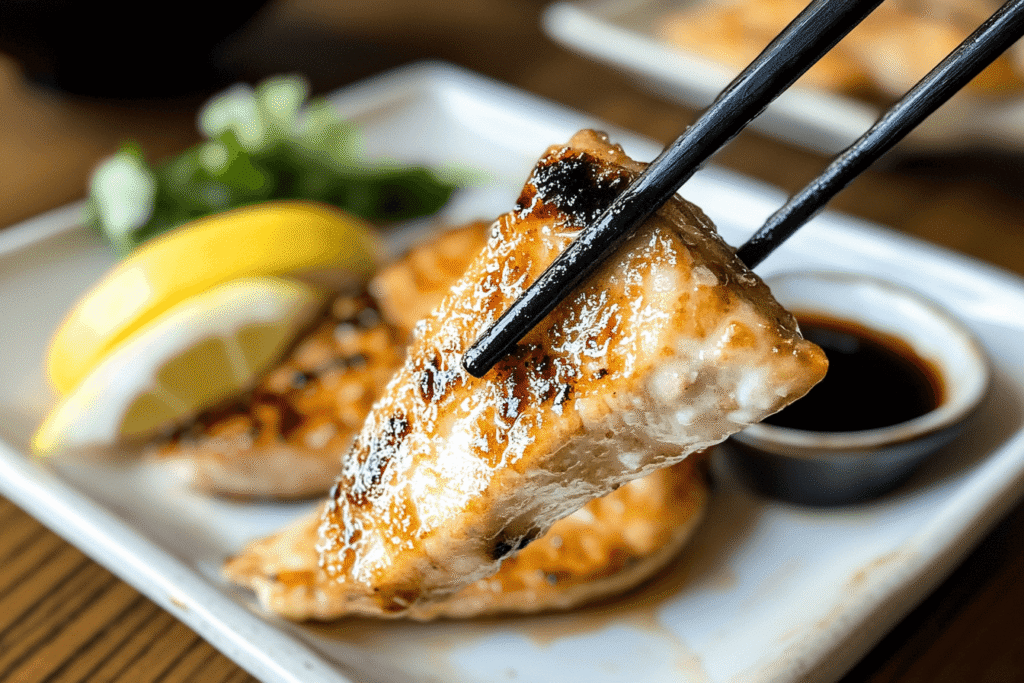
- Place the grilled Hamachi Kama on a serving plate and add lemon wedges as a vibrant, citrusy garnish. 🍋✨ Not only does this step enhance the presentation, but it also adds a refreshing touch to each bite.
- Serve the dipping sauce in a small ramekin alongside the fish. 🥢
- Add garnishes like chopped scallions or shiso leaves for extra flair. 🌿
Offer tips for plating, such as using rustic wooden boards for an authentic izakaya vibe.

Storage and Make-Ahead Tips
Discuss storage options:
- Leftovers: Store uneaten portions in an airtight container in the fridge for up to 2 days. ❄️
- Reheating: Reheat gently in a skillet or under the broiler to maintain crispiness. Skip the microwave when reheating, as it can cause the fish to lose its crispiness and become soggy. Instead, try methods that preserve its texture for the best results. 🐟✨
Mention that Hamachi Kama is best enjoyed fresh but reheats well if needed.
Recipe Variations
Encourage creativity with these ideas:
- Spicy Twist: Add chili flakes or sriracha to the dipping sauce for a kick. 🌶️
- Herb-Crusted Version: Coat the collars with a mix of panko breadcrumbs and parsley before grilling. 🌾
- Broiled Option: If you don’t have a grill, use your oven’s broiler for similar results. 🍳
Highlight that experimenting with flavors keeps the dish exciting.
Conclusion
Wrap up by encouraging readers to try this recipe:
“Hamachi Kama is proof that simplicity can lead to extraordinary flavors. 🌟 Whether you’re hosting friends or enjoying a quiet evening at home, this dish will impress everyone at the table. So grab some yellowtail collars, fire up the grill, and let the magic happen! 🍴✨”
Steer clear of the microwave when reheating, as it tends to trap moisture and leave the fish soggy. Instead, opt for methods that preserve its texture and flavor. 🚫🐟 Give this Hamachi Kama recipe a try—and don’t forget to share your creations with us!” ❤️
FAQs
Answer common questions in a friendly tone:
- Q: Where can I buy Hamachi Kama?
A: Check your local Japanese market or seafood supplier. Some online retailers also carry frozen options. 🛒 - Q: Is Hamachi Kama healthy?
A: Absolutely! It’s rich in omega-3 fatty acids and protein, making it a nutritious choice. 🥗 - Q: Can I bake instead of grill?
A: Yes! For a hassle-free option, pop the Hamachi Kama in the oven at 400°F (200°C) and bake for 15–20 minutes until perfectly cooked. 🍳✨ It’s an easy alternative that still delivers delicious results! - Q: What if I don’t have yuzu juice?
A: Lime or lemon juice works just fine. Get creative! 🍋 - Q: What’s the best way to tell if the Hamachi Kama is fully cooked?
A: The flesh should flake easily with a fork, and the skin should be crispy and golden brown. 🍴
If you’re planning a trip to Japan to experience authentic izakaya culture, don’t miss our guide to the best capsule hotels in Tokyo under $50 . It’s the perfect way to immerse yourself in Japanese lifestyle while staying budget-friendly!