
A Festive and Sweet Treat for the Holidays
Have you ever imagined combining the sweetness of fresh fruit with fluffy whipped cream between soft slices of bread?
If that sounds unusual, you’re not alone! Many people think sandwiches are only for savory fillings, but in Japan, the Fruit Sandwich (フルーツサンド) is a beloved dessert — light, colorful, and perfect for celebrations like Christmas (クリスマス).
In this guide, you’ll learn exactly how to make this festive dessert step-by-step, with all the secrets and tips to help your sandwiches look as adorable as Santa and snowmen. Whether you’re celebrating with family, friends, or kids, this recipe will brighten your Christmas table and bring a touch of Japanese charm to your holiday.
What Makes This Recipe Special
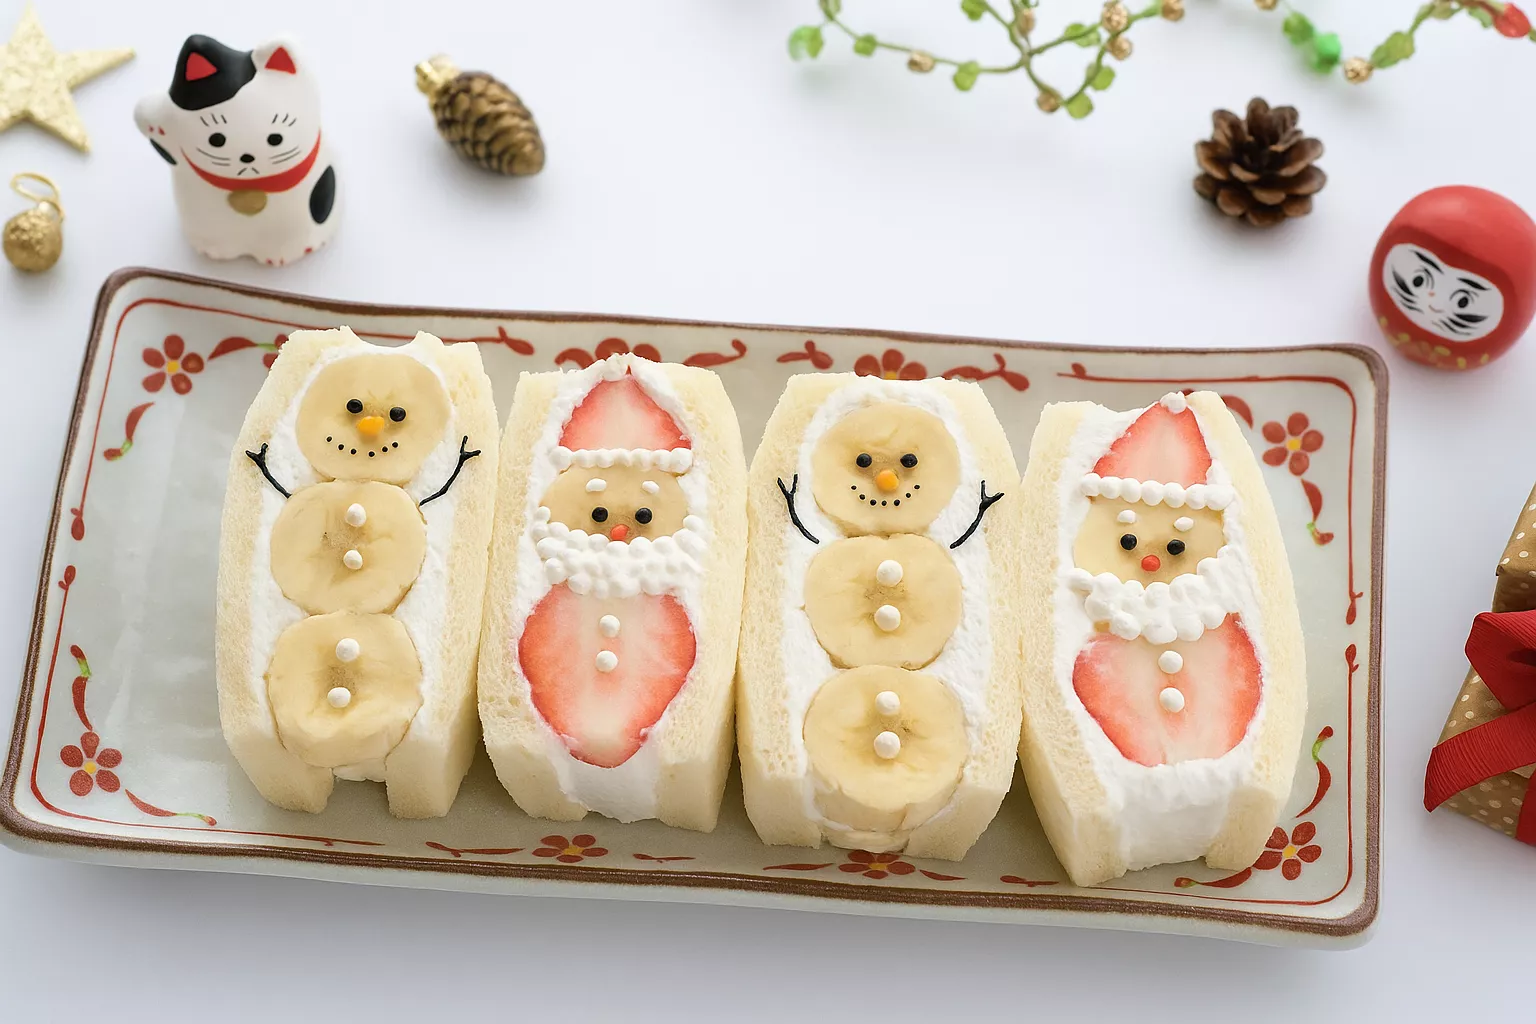
The Fruit Sandwich for Christmas (クリスマスのフルーツサンドイッチ) is not just a sweet snack — it’s a delightful edible decoration! It combines fluffy whipped cream, juicy strawberries, soft bananas, and pillowy white bread to create cute little Santas and snowmen.
It’s quick to make, requires no baking, and can be prepared in under 30 minutes. It’s the perfect choice for beginners, children, or anyone who wants to add a fun and festive touch to their dessert table without complicated steps.

What Is a Fruit Sandwich for Christmas?
The Japanese Fruit Sandwich is a soft, cream-filled sandwich made with fresh fruits and sweet whipped cream between slices of milk bread (called shokupan in Japan). During Christmas, it becomes extra festive — decorated with strawberries shaped like Santa hats, bananas as snowmen, and chocolate pens to draw cute faces.
Unlike heavy Western desserts, this treat feels light, refreshing, and joyful, perfect after a holiday meal. It’s also visually stunning, making it a favorite for Instagram, tea parties, and Japanese-inspired Christmas gatherings.
Essential Ingredients
Key Ingredients
Here’s what you’ll need to make your Christmas Fruit Sandwich (クリスマスのフルーツサンドイッチ):
- Sandwich bread (4 slices) – Use soft, fresh white bread. The texture is important because it holds the cream and fruit without tearing.
Tip: Japanese “shokupan” is ideal, but you can use milk bread or any fluffy white loaf. - Store-bought pre-whipped cream (1–2 boxes) – Smooth, light, and easy to spread. It saves time and gives the perfect texture.
Alternative: You can whip your own heavy cream with sugar for a richer flavor. - Strawberries (2–3 pieces) – The star of your Santa hats! Choose ripe red ones for color and sweetness.
- Bananas (2–3 pieces) – Their smooth texture balances the light cream. They’re also perfect for shaping snowmen.
- Chocolate pen (as needed) – Used for drawing faces or decorative details like Santa eyes and snowman smiles.
How to Make Japanese Milk Bread (Shokupan 食パン)
To make Shokupan, start by preparing a yudane — a cooked flour-and-water paste that keeps the bread soft and moist. Mix it with bread flour, sugar, salt, milk, butter, and yeast to form a smooth dough. Let it rise, shape it into loaves, and bake until golden. The result is a fluffy, slightly sweet bread perfect for toast or sandwiches.
👉 Full recipe: Japanese Milk Bread: Shokupan 食パン

Japanese Milk Bread: Shokupan 食パン
Why These Ingredients Matter
- Sandwich Bread: Choose soft, crustless white bread (Japanese shokupan) for the best texture. It holds the cream without falling apart.
- Whipped Cream: Using store-bought pre-whipped cream saves time and gives perfect consistency. If you prefer homemade, beat heavy cream with sugar until soft peaks form.
- Strawberries and Bananas: Their contrasting colors — red and yellow-white — create the iconic Santa and snowman look. You can also try kiwi or mandarin slices for variety.
- Chocolate Pen: The final touch! It adds personality and turns your sandwich into a Christmas story on a plate.
Substitutions and Variations
- Replace white bread with brioche or milk bread for a richer taste.
- Use yogurt cream instead of whipped cream for a lighter version.
- Add kiwi, orange, or blueberry for extra color.
- For a vegan option, use plant-based whipped cream and vegan sandwich bread.

Step-by-Step Instructions
Follow these simple steps to make your Christmas Fruit Sandwich (クリスマスのフルーツサンドイッチ):
Step 1: Prepare the Ingredients
Lay out all the items on your counter. Wash the strawberries and peel the bananas. Cut off about 1/3 of the top of each strawberry — this will become Santa’s hat. Slice the bananas into 4–5 cm thick pieces, trimming the sides to make them even and easy to stack.

Step 2: Prepare the Bread
Spread a thin layer of whipped cream over each slice of bread. This helps keep the fruit in place and prevents the bread from getting soggy. Then, pipe four vertical lines of whipped cream in the center of the bread — this will form pockets for the fruit.

Step 3: Add the Bananas
Lay the banana pieces flat along the whipped cream lines. They should fit neatly without gaps. If you see empty spaces, fill them with a little more whipped cream so the sandwich stays full and fluffy.

Step 4: Add More Cream
Spread another thin layer of whipped cream over the bananas. Make sure the surface is smooth and even — this will create a beautiful cross-section when you slice it later.

Step 5: Close the Sandwich
Place another slice of bread on top and press gently. Wrap the sandwich tightly with plastic wrap to help it hold shape. Place it in the refrigerator for at least 30 minutes to firm up.

Step 6: Shape the Santas and Snowmen
Now it’s time to create the Christmas characters! Cut the strawberries and bananas again so the banana pieces are slightly longer than the strawberries. Slice a thin layer off one side of each banana piece to make a flat base.


Step 7: Assemble the Characters
Place a banana piece between two strawberry halves — the flat base should help them sit neatly together. This combination forms the head and hat for your Santa or snowman.

Step 8: Assemble the Sandwich
Spread more whipped cream on a fresh slice of bread, arrange your fruit characters tightly together, and squeeze whipped cream between each fruit piece. Spread one last layer of whipped cream on top and add another slice of bread to finish.


Step 9: Chill and Slice
Wrap the sandwich tightly again in plastic wrap and chill for at least one hour. Once chilled, cut it cleanly in half with a sharp knife to reveal the beautiful fruit cross-section. Wipe the knife between cuts for a clean edge.


Step 10: Decorate
Now for the fun part! Use the chocolate pen to draw faces on your Santas and snowmen — add eyes, smiles, and tiny buttons. You can even use small candy pieces for noses or hats.

Step 11: Serve
Place your Fruit Sandwich for Christmas (クリスマスのフルーツサンドイッチ) on a Japanese-style plate or a white marble dish. The contrast of red strawberries, white cream, and soft bread looks stunning — perfect for Christmas morning or a festive tea party.

Secrets to Success and Expert Tips
- Use cold cream: Warm whipped cream melts quickly and makes the bread soggy. Keep your cream chilled until you’re ready to use it.
- Cut with a clean knife: For beautiful layers, wipe your knife after each cut.
- Don’t overfill: Too much cream can make the sandwich slide apart.
- Chill before cutting: Always refrigerate before slicing to help the cream set.
- Choose ripe but firm fruit: Overripe fruit releases too much juice and ruins the texture.
Assembly and Presentation
Building your Christmas Fruit Sandwich (クリスマスのフルーツサンドイッチ) is like decorating a cake — the fun is in the details.
- Place one slice of cream-covered bread on your work surface.
- Arrange the fruits in a pattern (alternating strawberries and bananas) to form Santa and snowmen.
- Gently press the second slice of bread on top.
- Wrap tightly in plastic wrap, removing any air.
- Refrigerate for at least one hour before cutting.
When serving, slice diagonally to reveal the colorful fruit pattern. You can place each piece on a Japanese-style plate for an elegant presentation.
Presentation Ideas
- Japanese-style plate: Serve on small white or wooden plates for a minimalist look.
- Christmas decoration: Add mint leaves, powdered sugar “snow,” or small ornaments for a festive touch.
- Cross-section display: Slice diagonally to show the bright fruit colors — perfect for photos!
Hana’s Recipe Tips
- Balance is key: Use equal layers of cream and fruit so every bite tastes balanced.
- Refrigerate overnight if you want the flavors to blend more deeply.
- Get creative with shapes: Use cookie cutters to make heart or star-shaped sandwiches.
- Try matcha cream or chocolate whipped cream for colorful variations.
- Use Japanese plates (和皿) and small forks for an authentic experience.

Storage and Make-Ahead Tips
- Refrigerator: Store wrapped sandwiches in the fridge for up to 24 hours. The bread stays soft and the cream fresh.
- Freezing: Not recommended, as whipped cream and fruit change texture when frozen.
- Make-ahead: You can prepare the sandwiches the night before your Christmas party. Keep them tightly wrapped to avoid drying out.
- Serving tip: Let them rest at room temperature for 10 minutes before serving so the cream softens slightly.
🍓 Want to Try the Classic Version?
If you loved this Christmas twist, you’ll also enjoy the traditional Japanese Fruit Sando, a simple yet elegant dessert made with whipped cream and seasonal fruits. Try it here:
👉 Fruit Sando – The Perfect Japanese Dessert
 フルーツサンド")
Japanese Fruit Sandwich (Fruit Sando) フルーツサンド
Recipe Variations
Want to try new ideas? Here are some creative twists:
- Matcha Christmas Fruit Sandwich: Add a teaspoon of matcha powder to your whipped cream for a green tea flavor and color contrast.
- Chocolate Berry Sandwich: Use chocolate whipped cream and mixed berries (blueberries, raspberries) for a richer taste.
- Tropical Style: Swap strawberries for mango or pineapple slices.
- Mini Santa Sandwiches: Make bite-sized versions using small bread circles for party platters.
- Kid’s Fun Version: Let kids decorate with colored icing or sprinkles.
Each version brings a new flavor and festive charm while keeping the classic Japanese Christmas sandwich spirit alive.
Conclusion
The Fruit Sandwich for Christmas (クリスマスのフルーツサンドイッチ) is more than just a dessert — it’s a joyful experience that combines creativity, tradition, and sweetness.
With just a few simple ingredients and your imagination, you can turn soft bread and fruit into adorable Santas and snowmen that melt hearts and bring smiles.
It’s quick, fun, and refreshing — a perfect end to your Christmas meal or a cheerful addition to your holiday breakfast table. So gather your family, prepare your whipped cream, and enjoy making this cute Japanese Christmas treat at home!
FAQs
1. Can I use homemade whipped cream instead of store-bought?
Yes! Whip 200 ml of heavy cream with 2 tablespoons of sugar until soft peaks form. It will taste fresher but requires more time.
2. What fruits are best for Fruit Sandwiches?
Strawberries and bananas are classic, but kiwi, blueberries, or oranges also work beautifully. Just choose fruits that aren’t too watery.
3. How do I keep the bread from getting soggy?
Spread a thin layer of whipped cream on both slices before adding fruit. The cream acts as a moisture barrier.
4. Can I prepare the sandwiches a day before Christmas?
Yes, you can make them the night before and chill overnight. Just keep them tightly wrapped to preserve freshness.
5. Are Fruit Sandwiches healthy?
They’re lighter than most desserts! Fruits provide vitamins and fiber, while whipped cream adds a creamy touch without heavy sugar.
6. Can I make it vegan?
Of course. Use coconut whipped cream and vegan bread for a dairy-free version.
7. What’s the best way to decorate for Christmas?
Use whipped cream to draw Santa beards, add mini chocolate chips for eyes, and sprinkle powdered sugar for a snowy finish.
Final Thoughts
The Fruit Sandwich for Christmas (クリスマスのフルーツサンドイッチ) is a true celebration of Japanese creativity — simple, elegant, and bursting with color.
It’s a recipe that brings families together, turning ordinary ingredients into delightful Christmas memories. Try it this holiday season and share your festive masterpiece on your table — it’s the sweetest way to say Merry Christmas!
Fruit Sandwich for Christmas クリスマスのフルーツサンドイッチ
Course: DessertCuisine: JapaneseDifficulty: Easy4
servings14
minutes30
minutes230–270
kcalA cute Japanese Fruit Sandwich for Christmas (クリスマスのフルーツサンドイッチ) filled with lightly sweet whipped cream, strawberries, and bananas. The sandwiches are chilled, then sliced to show Santa and snowman faces. No baking, kid-friendly, and perfect for a festive breakfast, snack, or dessert.
Ingredients
Sandwich bread – 4 slices, soft and fresh (shokupan or milk bread works best)
Pre-whipped cream – 1–2 cups (store-bought spray/tub or stabilized whipped cream)
Strawberries – 2–3 large, stems removed
Bananas – 2–3 medium, peeled
Chocolate pen – as needed, for eyes, smiles, and buttons
- Optional (nice to have)
Powdered sugar for “snow”
A little strawberry jam or Nutella for extra flavor
Kiwi or blueberries for color accents
Directions
- Prep the fruit
Strawberries: Slice off about the top ⅓ of each berry to form the Santa “hat.” Keep both pieces.
Bananas: Cut into 4–5 cm (1½–2 in) lengths. Trim a very thin slice off two opposite sides so pieces stack neatly and won’t roll. - Build the first sandwich (banana base)
Cream coat: Spread a thin film of whipped cream on one bread slice (this keeps bread from getting soggy).
Pipe support lines: Pipe four vertical lines of cream down the center.
Lay bananas: Arrange banana pieces flat across the cream.
Fill gaps: Pipe cream into empty spaces so the surface is level.
Cover & close: Smooth a final thin layer of cream, top with the second bread slice, wrap tightly in plastic, and chill. - Build the Santa / snowman sandwich (patterned cross-section)
Size match: Cut a banana piece so it is slightly longer than a strawberry piece. Slice a thin strip off one long side so it sits flat.
Assemble figures: Place one banana between two strawberry pieces (hat on top, berry base below) to form a “Santa/snowman” stack.
Cream bed: Spread cream on fresh bread as before and set the fruit stacks upright so they touch snugly.
Stabilize: Pipe cream between and around fruit to lock them in place.
Finish: Smooth cream on top, cap with the second bread slice, wrap tightly, and chill at least 1 hour for clean cuts. - Slice & decorate
Unwrap. With a sharp knife, wipe the blade between cuts, then halve the sandwiches to reveal the pattern.
Use the chocolate pen to draw eyes, smiles, and buttons. Add small dots of cream for beards or pom-poms. Dust with powdered sugar if you like.
Notes
- ✪ Cold is key: Keep cream and fruit cold so the bread doesn’t tear.
✪ Plan the cross-section: Place fruit where you want to see it after cutting.
✪ Clean slices: Chill well and wipe the knife after every cut.
✪ Bread choice: Fluffy shokupan makes the neatest edges; remove crusts if you prefer.
✪ Make it sturdier: If using very juicy fruit, lightly pat dry before assembling.
Did you make this recipe?
Tag @jp.dishes on Instagram so we can see your delicious creation!