Have you ever wondered what makes Japanese street food so comforting and irresistible? Among all the sizzling dishes that fill Japan’s busy food stalls, one savory pancake always stands out Okonomiyaki (お好み焼き). But what exactly makes this dish so special that locals call it “Japanese soul food”? Is it the fluffy cabbage batter, the smoky pork belly on top, or the sweet and tangy okonomiyaki sauce that brings it all together?
Today, you’ll discover how to make this mouthwatering dish right in your kitchen — no trip to Osaka or Hiroshima needed! Whether you’re a beginner cook or a Japanese food lover, this easy recipe will guide you step by step to create your own Okonomiyaki (お好み焼き) that tastes just like the ones in Japan’s best street stalls.
Overview
Okonomiyaki (お好み焼き) is often called the Japanese-style savory pancake, but it’s so much more than that. It’s a warm, hearty mix of shredded cabbage, eggs, and thinly sliced pork belly held together in a light batter and topped with a rich, flavorful sauce.
The word “okonomi” means “as you like,” and “yaki” means “grilled.” So, the name literally translates to “grill it how you like.” That’s the true charm of this dish — it’s flexible, creative, and endlessly customizable.
What Makes This Recipe Special
This version of Okonomiyaki focuses on the Osaka-style method, where all ingredients are mixed together and cooked on a griddle or pan. It’s a perfect choice for anyone who wants a quick, satisfying meal that feels both homey and festive. The combination of crispy pork belly and soft, fluffy cabbage gives a perfect balance of textures.
- Time requirement: About 25–30 minutes total
- Difficulty level: Easy to moderate
- Servings: 2 large or 4 small pancakes
")
Okonomiyaki (お好み焼き) @JapanDishes
What Is Okonomiyaki お好み焼き?
Okonomiyaki is a beloved dish from Japan’s Kansai region, especially in Osaka, known as the country’s “food capital.” It’s often cooked on a teppan (iron griddle) at home or in casual restaurants where diners can cook it themselves. Think of it as Japan’s answer to comfort food — simple ingredients, big flavor, and endless possibilities for personalization.
Each bite offers a mix of savory pork, tender cabbage, and creamy sauce, creating a perfect balance of sweetness and umami. Some compare it to a fusion of a pancake and an omelet, but Okonomiyaki truly has its own identity — one that celebrates creativity and home-style warmth.
 (3)")
Okonomiyaki (お好み焼き) @JapanDishes
Essential Ingredients
Here’s everything you need to make authentic Okonomiyaki (お好み焼き) at home. The ingredients are simple, but each one plays a key role in creating the perfect texture and flavor.
Main Ingredients
- Thinly sliced pork belly – 200g
This adds richness and depth to the dish. The fat melts as it cooks, infusing the batter with flavor. If pork belly isn’t available, you can substitute bacon, shrimp, or thin beef slices. - Cabbage – ½ head (about 500g)
Finely shredded cabbage gives Okonomiyaki its signature texture — light, juicy, and slightly sweet. It’s the heart of the pancake. You can also use napa cabbage or savoy cabbage for a softer result. - Eggs – 4
Eggs bind the ingredients together and add fluffiness. They also help the batter brown beautifully. - Potato starch – 6 tablespoons
Potato starch makes the mixture tender and helps it hold shape. You can also use cornstarch or all-purpose flour if preferred. - Japanese-style dashi stock powder – 2 teaspoons
Dashi adds umami, the savory flavor that makes Japanese dishes stand out. It’s what gives Okonomiyaki that irresistible depth. - Cane sugar (or regular sugar) – 2 teaspoons
A small amount of sugar balances the savory ingredients and enhances the sauce flavor later. - Cooking oil – as needed
Use neutral oil such as canola or vegetable oil for frying. - Okonomiyaki sauce – to taste
This thick, sweet-savory sauce is similar to Worcestershire but richer. You can find bottled Okonomiyaki sauce or make it by mixing ketchup, soy sauce, and Worcestershire sauce. - Japanese mayonnaise – to taste
Creamy and slightly tangy, it complements the sauce perfectly. - Dried bonito flakes (katsuobushi) – to taste
These thin flakes dance from the heat of the pancake, adding flavor and presentation flair.
Optional Add-Ons
- Chopped green onions for freshness
- Pickled ginger (beni shoga) for a tangy bite
- Ten-kasu (tempura bits) for crunch
- Cheese for a creamy fusion twist
Step-by-Step Instructions
Making Okonomiyaki (お好み焼き) is all about layering and patience. Follow these steps for perfect results every time.
Step 1: Prepare the Cabbage
Cut the cabbage into thin, 1 cm strips. A sharp knife or mandoline helps create even slices. Place the cabbage in a large mixing bowl — this will be the base of your batter.

Step 2: Make the Batter
Add the following into the bowl with cabbage:
- 4 eggs
- 6 tablespoons potato starch
- 2 teaspoons dashi stock powder
- 2 teaspoons cane sugar

Mix everything together until the cabbage is evenly coated and the mixture becomes thick. The texture should be moist but not runny.

Tip: Don’t overmix. Overmixing can make the pancake heavy instead of fluffy.
Step 3: Heat the Pan
Add a thin layer of oil to a frying pan or griddle and heat it over low to medium heat. Spread the cabbage mixture evenly in the pan, shaping it into a thick round pancake, about 2 cm thick.
Step 4: Add the Pork Belly
Arrange the thinly sliced pork belly over the top of the cabbage mixture. This will cook into the surface and give it a crispy, flavorful crust.
Cover the pan and cook gently for about 5–6 minutes, checking occasionally to make sure it doesn’t burn.

Step 5: Flip the Pancake
Once the bottom is golden brown, it’s time to flip. Use a large spatula or a plate:
- Place a plate over the pan.
- Carefully flip the pan upside down so the Okonomiyaki lands on the plate.
- Slide it back into the pan, pork side down.

Cook for another 5–6 minutes until both sides are evenly browned and the center is cooked through.
Step 6: Sauce and Toppings
When done, slide the Okonomiyaki onto a serving plate. Spread Okonomiyaki sauce generously over the top, drizzle with Japanese mayonnaise, and sprinkle with bonito flakes. You can also add seaweed flakes (aonori) or green onions for color and flavor.

Secrets to Success and Expert Tips
- Use fresh cabbage. It should be crisp and slightly sweet. Fresh cabbage helps the batter stay light.
- Keep the heat moderate. Cooking too quickly burns the outside before the center sets.
- Cover while cooking. This traps steam and ensures even cooking.
- Don’t flatten the pancake. Pressing down removes air and makes it dense.
- Rest before serving. Let it sit for 1–2 minutes so the layers firm up and the sauce adheres beautifully.
Expert cooks in Osaka often say the secret lies in balance — between texture and flavor, between heat and patience. A perfect Okonomiyaki should have a crispy exterior and a soft, moist center.
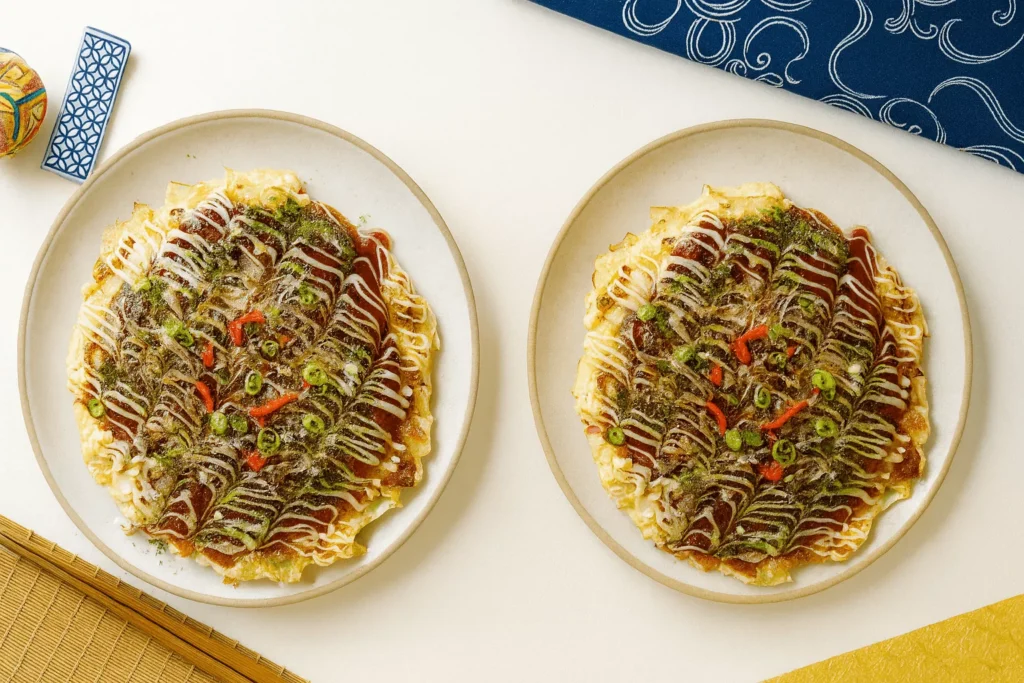
Assembly
When assembling Okonomiyaki (お好み焼き), presentation matters almost as much as taste.
- Start by placing your cooked pancake on a flat Japanese-style plate.
- Use a brush or spoon to coat the surface evenly with Okonomiyaki sauce.
- Drizzle Japanese mayonnaise in a zigzag or circular pattern — it’s traditional and visually appealing.
- Sprinkle dried bonito flakes and aonori seaweed on top.
- Optional: Add a small pile of pickled ginger in the center for contrast.
The result is not just delicious but visually beautiful — a dish that reflects the artistry of Japanese home cooking.
 @JapanDishes")
Okonomiyaki (お好み焼き) @JapanDishes
Hana’s Recipe Tips
Hana, the creator behind JapanDishes, shares her favorite Okonomiyaki secrets:
- Cut cabbage finely but not too small. The texture should be crunchy yet tender.
- Add a little grated yam or nagaimo (if available) for extra fluffiness — it’s a traditional Osaka touch.
- Try cooking smaller pancakes if you’re new to flipping. They’re easier to handle and cook evenly.
- Use Japanese plates or light beige designs for serving. It enhances the presentation and feels authentic.
These small touches make your homemade Okonomiyaki feel like something straight out of a cozy Japanese kitchen.
Storage and Make-Ahead Tips
Okonomiyaki tastes best fresh off the pan, but you can easily store leftovers.
- Refrigerator: Wrap each pancake in plastic wrap or place in an airtight container. It stays fresh for up to 2 days.
- Freezer: Wrap individually and store for up to 1 month. To reheat, thaw in the fridge overnight and warm in a pan or oven until hot.
- Reheat tip: Avoid microwaving too long — it can make the texture soggy. Use a skillet for best results.
You can also prepare the batter and cabbage mixture in advance. Store it covered in the fridge for up to 4 hours, then cook right before serving.
Recipe Variations
The beauty of Okonomiyaki (お好み焼き) lies in its flexibility. You can change ingredients based on your taste or what you have at home.
- Seafood Okonomiyaki: Replace pork with shrimp, squid, or scallops for a light, ocean-inspired flavor.
- Vegetarian Okonomiyaki: Omit the meat and add mushrooms, corn, or tofu. Use vegetarian dashi or water instead of regular stock.
- Cheese Okonomiyaki: Add shredded mozzarella or cheddar to the batter for a melty surprise inside.
- Hiroshima-style Okonomiyaki: Layer the ingredients instead of mixing them and add cooked yakisoba noodles for extra heartiness.
- Mini Okonomiyaki: Make small, bite-sized versions perfect for parties or snacks.
Experimenting with these variations helps you discover your own favorite style — after all, “okonomi” means “as you like.”
Conclusion
Okonomiyaki (お好み焼き) isn’t just a pancake — it’s an experience. From the sizzling sound on the pan to the swirling sauce on top, every part of the process is joyful and satisfying. It captures the warmth of Japanese comfort food and invites creativity in every bite.
Whether you’re cooking for yourself, your family, or friends, Okonomiyaki brings people together. It’s simple, quick, and endlessly customizable — the perfect meal for any day.
If you love exploring Japanese culture beyond food, check out Kitakyushu 5 Hidden Gems Locals Don’t Want You to Miss on our travel site JapanToVisit.com. It’s a great guide to discover lesser-known destinations in Japan that pair perfectly with your culinary adventures.
So next time you crave something hearty yet fun to make, try this Okonomiyaki recipe. Enjoy the process, experiment with toppings, and share it proudly — just like they do in Osaka’s lively street stalls.
FAQs
Q1. What is Okonomiyaki made of?
It’s a savory Japanese pancake made from cabbage, eggs, flour or starch, and toppings like pork or seafood. The name means “grill as you like,” reflecting its customizable nature.
Q2. Is Okonomiyaki healthy?
Yes, it’s relatively healthy — packed with cabbage, eggs, and lean protein. You can make it lighter by reducing oil and using more vegetables.
Q3. Can I make Okonomiyaki without pork?
Absolutely. You can use shrimp, squid, mushrooms, or even tofu. The key is to balance flavor and texture.
Q4. How do I make Okonomiyaki sauce at home?
Mix 2 tablespoons of ketchup, 1 tablespoon of Worcestershire sauce, and ½ tablespoon of soy sauce. Adjust sweetness with a little sugar or honey if desired.
Q5. How long does it take to cook Okonomiyaki?
It usually takes about 10–12 minutes — 5–6 minutes per side on medium heat.
Q6. Can I prepare Okonomiyaki batter in advance?
Yes, but cook it the same day for the best texture. The cabbage may release water if stored too long, so mix again before frying.
Q7. How do I store leftover Okonomiyaki?
Keep it wrapped in plastic or an airtight container in the fridge for up to 2 days, or freeze for longer storage. Reheat in a pan to retain crispiness.
Q8. What’s the difference between Osaka and Hiroshima Okonomiyaki?
Osaka-style mixes all ingredients together, while Hiroshima-style layers them and adds noodles and fried eggs. Both are delicious in their own way.
Final Thought:
Once you try making Okonomiyaki (お好み焼き) at home, you’ll realize how simple yet satisfying this dish truly is. Every bite offers a piece of Japan’s culinary heart warm, flavorful, and made “as you like it.”
If you enjoy trying Japanese comfort foods, you’ll also love my Creamy Japanese Mentaiko Pasta Recipe — another simple yet flavorful dish that’s rich, satisfying, and full of umami. It pairs beautifully with Okonomiyaki for a cozy Japanese-style dinner at home.

Okonomiyaki Recipe お好み焼き
Course: AppetizersCuisine: JapaneseDifficulty: Easy4
servings10
minutes15
minutes310
kcalOkonomiyaki (お好み焼き) is a popular Japanese savory pancake filled with cabbage, pork belly, and flavorful batter. Topped with okonomiyaki sauce, mayonnaise, and bonito flakes, it’s crispy outside and tender inside — a perfect comfort meal straight from Osaka’s street stalls.
Ingredients
- Main Ingredients:
200g thinly sliced pork belly
½ head cabbage (about 500g), finely shredded
4 large eggs
6 tablespoons potato starch (or cornstarch)
2 teaspoons Japanese-style dashi stock powder
2 teaspoons cane sugar (or regular sugar)
2 tablespoons vegetable oil (for cooking)
- Toppings:
Okonomiyaki sauce (to taste)
Japanese mayonnaise (to taste)
Dried bonito flakes (katsuobushi), as desired
Optional: chopped green onions, pickled ginger, or seaweed flakes (aonori)
Directions
- Step 1:
Chop the cabbage into thin strips (about 1 cm wide) and place it in a large mixing bowl. - Step 2:
Add the eggs, potato starch, dashi powder, and cane sugar. Mix gently until everything is well coated but not overly mashed. The batter should be thick and slightly sticky. - Step 3:
Heat a frying pan or griddle over low to medium heat. Add a drizzle of oil and spread the cabbage mixture evenly into a round shape, about 2 cm thick. - Step 4:
Lay the sliced pork belly pieces on top of the batter, covering the surface evenly. Cover the pan with a lid and cook for 5–6 minutes until the bottom turns golden brown. - Step 5:
Place a plate over the pan, flip the pancake carefully, and slide it back into the pan (pork side down). Cover again and cook for another 5–6 minutes until the other side is golden and cooked through. - Step 6:
Transfer the Okonomiyaki to a plate. Brush with Okonomiyaki sauce, drizzle Japanese mayonnaise in zigzags, and top with bonito flakes. Add optional toppings for color and flavor.
Notes
- ✪ Use fresh cabbage for the best crunch and sweetness.
✪ Keep the heat moderate to prevent burning while ensuring the center cooks evenly.
✪ You can substitute pork belly with shrimp, squid, or even tofu for a vegetarian twist.
✪Rest the pancake for 1–2 minutes before serving — this helps the toppings stick and the texture settle.