Have you ever wondered if there’s a Japanese dessert that’s both refreshingly cool and unbelievably easy to make? If you love exploring unique textures and delicate flavors, warabimochi might be your new favorite treat. Unlike traditional mochi made from sticky rice, warabimochi has a jelly-like consistency and melts in your mouth. It’s perfect on a hot day, and the best part? You can whip it up right in your kitchen with just a few ingredients.
Jump to Recipe Print RecipeWhat Is Warabi Mochi (How to Make Warabi Mochi わらび餅)?
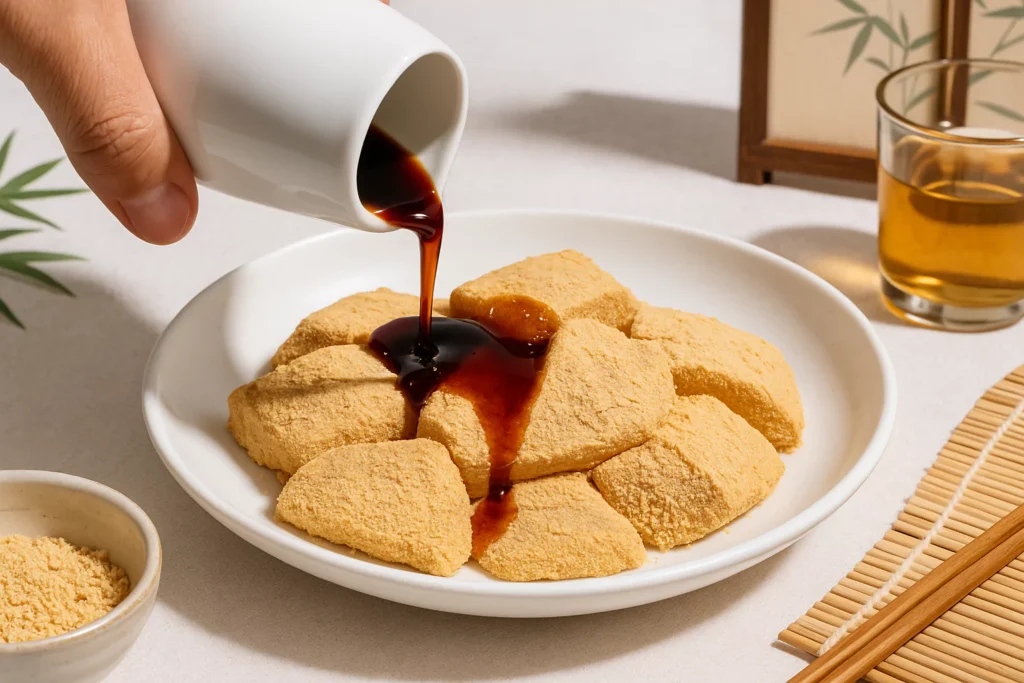
Warabimochi is a traditional Japanese confection often found in the Kansai region and typically enjoyed in summer. Unlike classic mochi made from glutinous rice, this dessert is crafted from bracken starch, resulting in a translucent, jelly-like texture that’s incredibly smooth and soft. It’s commonly coated with roasted soybean flour called kinako and served with kuromitsu, a dark syrup made from unrefined sugar. The combination is light, nutty, and just sweet enough to satisfy. Preparing warabimochi at home involves simple ingredients and minimal cooking—perfect for beginners looking to explore authentic Japanese treats.

Warabi Mochi@JapanDishes
Table of Contents
Why Warabimochi Is So Special
Warabimochi is a beloved Japanese sweet, often enjoyed during summer festivals or as a cool afternoon snack. What makes it so special is its distinctive texture—soft, slippery, and subtly sweet. It takes less than an hour to make and is considered a beginner-friendly recipe. No complicated techniques are needed, just a bit of stirring and patience.
Time Required: 40 minutes (including chilling time)
Difficulty Level: Easy
Servings: About 4

warabimochi@JapanDishes
Essential Ingredients and Substitutions
To make authentic warabimochi, you only need a few simple ingredients. Here’s what you’ll need:
- 3/4 cup warabi mochiko or warabiko (bracken starch): This is the traditional ingredient. If you can’t find it, you can use potato starch or tapioca starch. Just note that the texture will be slightly different.
- 1/2 cup sugar: Balances the earthy flavor of the starch. You can reduce it to 1/3 cup if you plan to use plenty of kuromitsu syrup.
- 1 3/4 cups water: Helps create the jelly-like texture.
For the Toppings:
- 1/4 cup kinako (roasted soybean flour): Adds a nutty flavor and prevents sticking.
- Kuromitsu (black sugar syrup): A rich, molasses-like syrup that brings depth and sweetness.
Step-by-Step Instructions
Step 1: Prep Your Ingredients
Before starting, prepare all your ingredients. Line a baking sheet with a dusting of kinako. This will prevent sticking and add flavor to the base of your warabimochi.

Step 2: Combine Ingredients in a Pan
In a medium saucepan, add the warabi mochiko, sugar, and water. Use a whisk or spatula to mix until the sugar dissolves and the mixture is smooth.

Step 3: Heat and Stir
Place the saucepan over medium heat. Stir continuously until the mixture begins to boil. Then reduce the heat to low.

Step 4: Stir Vigorously
Now comes the most important part. Use a wooden spatula to stir the mixture vigorously for about 10 minutes. It will thicken gradually and become translucent. This is your sign that it’s ready.

Step 5: Transfer to the Tray
Pour the thickened warabimochi onto your kinako-covered tray. Use a spatula to spread it evenly. Sprinkle more kinako on top.

Step 6: Chill
Place the tray in the refrigerator for 20 minutes. This helps firm up the warabimochi and makes it easier to cut.

How to Assemble and Serve
Once chilled, remove the tray from the fridge. Carefully turn the warabimochi onto a cutting board. Use a wet knife to cut into 3/4-inch cubes. Roll each piece in kinako to prevent sticking and for added flavor.

Arrange the cubes on small serving plates. For an extra burst of flavor, drizzle with kuromitsu syrup. Serve immediately and enjoy.

Hana’s Recipe Tips
Our friend Hana, a home cook passionate about Japanese sweets, offers these helpful tips:
- Use a wooden spatula for stirring; it gives you better control.
- If you prefer a softer texture, chill the warabimochi for just 15 minutes.
- Always wet your knife before cutting to prevent sticking.
- Don’t skip the kinako—it balances the flavors and adds texture.

Warabi Mochi わらび餅
Course: DessertCuisine: JapaneseDifficulty: Easy4
servings5
minutes15
minutes120
kcalA silky, jelly-like Japanese summer dessert made from warabi starch and dusted with kinako, served with kuromitsu syrup. Light, refreshing, and easy to make at home.
Ingredients
¾ cup warabi mochiko (bracken starch)
½ cup sugar (adjust to taste)
1¾ cups water
¼ cup kinako (roasted soybean flour)
Kuromitsu (black sugar syrup) for serving
Directions
- Prepare the Tray: Lightly dust a baking sheet with kinako to prevent sticking. Set aside.
- Mix Ingredients: In a medium saucepan, combine the warabi mochiko, sugar, and water. Stir until the mixture is smooth and fully dissolved.
- Cook the Mixture: Heat the pan over medium heat. Stir continuously as it begins to thicken. Once it boils, lower the heat and stir vigorously for about 10 minutes. The mixture will become glossy and translucent.
- Transfer and Cool: Pour the mixture onto the kinako-dusted tray. Spread it evenly. Sprinkle more kinako on top. Let it cool in the refrigerator for 20 minutes.
- Cut and Serve: After chilling, turn the mochi onto a cutting board and slice into ¾-inch cubes. Coat each piece with additional kinako and drizzle with kuromitsu syrup. Serve chilled.
Notes
- You can substitute potato or tapioca starch, but the texture will be different.
Warabi mochi is best eaten the same day for the best texture. Avoid refrigerating for too long, as it can harden.
Storage and Make-Ahead Tips
Warabimochi is best eaten fresh but can be made a few hours in advance.
- Room Temperature: Store in an airtight container for up to 2 days. It may turn white and firm, which is normal.
- Refrigeration: If you must refrigerate, chill for only 20–30 minutes before serving. Longer storage in the fridge will make it hard.
- Freezing: Not recommended, as the texture will change.
Creative Variations
Looking to get creative with your warabimochi? Try these ideas:
- Matcha Warabimochi: Add 1 tsp matcha powder to the starch mixture.
- Fruit-Infused Warabimochi: Mix in small fruit pieces like mango or strawberries.
- Coconut Warabimochi: Replace some of the water with coconut milk for a tropical twist.
- Chocolate Kinako: Blend cocoa powder with kinako for a nutty, chocolatey coating.
Conclusion
Warabimochi is a quick, refreshing treat that offers a taste of traditional Japanese culture. It’s easy to make, fun to serve, and endlessly customizable. Whether you’re introducing your family to new flavors or looking for a light dessert, this recipe is a wonderful way to explore Japanese sweets at home.
So go ahead, gather your ingredients and enjoy the smooth, silky bite of homemade warabimochi. It’s a little bit of Japan in every mouthful.
FAQs About Warabi mochi
For more delicious Japanese dessert ideas, check out our Melon Pan recipe for another easy and delightful treat.
Q: What is warabimochi made of?
A: It’s made of warabi starch, sugar, and water. It’s different from regular mochi made with glutinous rice.
Q: Is warabimochi healthy?
A: It’s low in fat and gluten-free. Kinako also adds protein and fiber, making it a light and healthy dessert option.
Q: Can I use other starches instead of warabi mochiko?
A: Yes, potato starch or tapioca starch can be used, but the texture will be different.
Q: How long can I store warabimochi?
A: It’s best eaten fresh. At room temperature, it lasts up to 2 days. If stored in the fridge, the texture may harden.
Q: What does warabimochi taste like?
A: It has a mildly sweet, jelly-like texture. The kinako and kuromitsu add nutty and rich flavors.
Q: Can I make this recipe vegan?
A: Yes, it already is! All the ingredients are plant-based.
Warabimochi is simple, satisfying, and full of cultural charm. Try it once, and you might find yourself making it over and over again.
You may also enjoy learning about premium Japanese cuisine in this Steak House Japan guide, which highlights the top Wagyu dining spots.