Have you ever wondered how just a few simple ingredients can create one of Japan’s most comforting meals?
If you’ve ever tasted a cozy bowl of steaming rice topped with tender chicken and soft-cooked egg simmered in sweet-salty broth, you’ve likely met Oyakodon. But what makes this humble dish a staple in Japanese homes and restaurants alike? And can you make it easily at home—even if you’re new to cooking Japanese food?
Let’s explore everything you need to know about making authentic Oyakodon, right in your own kitchen.
Table of Contents
Why This Recipe Stands Out
- Time-Saving: Ready in under 30 minutes.
- Beginner-Friendly: Simple steps and basic ingredients.
- Customizable: Easy to make vegetarian or spicy.
- Comforting: Warm, soft, and flavorful—perfect for cozy evenings.
This recipe is ideal for anyone just getting started with Japanese cooking. If you can slice an onion and crack an egg, you can make Oyakodon.
Jump to Recipe Print RecipeWhat is Oyakodon?
Oyakodon (親子丼) literally means “parent and child bowl.” The name is poetic—it refers to the two main ingredients: chicken (the parent) and egg (the child). These two are gently simmered in a seasoned broth, then spooned over warm, steamed rice. It’s a one-bowl wonder—sweet, savory, soft, and satisfying.
You’ll find it everywhere in Japan: school cafeterias, train station eateries, and home kitchens. Oyakodon is the kind of meal that reminds people of comfort, warmth, and family. It’s loved by kids and adults alike for its gentle flavor and soft texture. Best of all, it comes together in about 30 minutes, making it ideal for busy days.

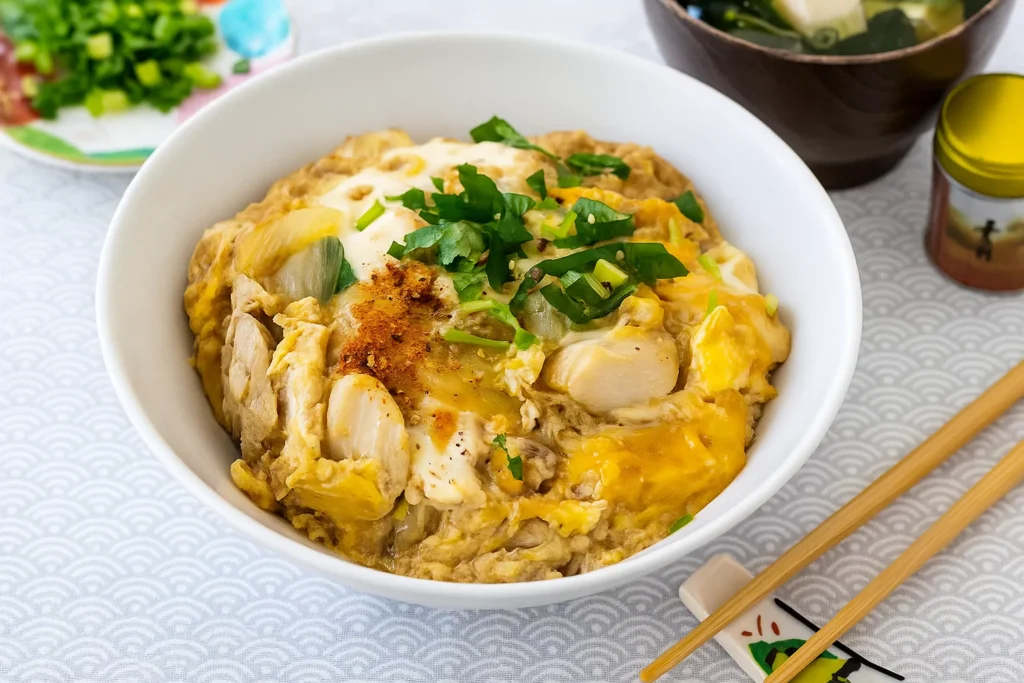
Oyakodon @JapanDishes
Essential Ingredients for Oyakodon
Let’s go over the key components that give this dish its signature taste and texture:
Main Ingredients
- Chicken Thighs (10 oz): Juicy and flavorful. Thighs are preferred for tenderness, but you can use chicken breast if needed.
- Eggs (3-4): Use fresh, room-temperature eggs. The yolks stay golden and creamy while the whites gently set.
- Onion (½): Sweet when cooked, onions add depth to the broth.
- Steamed Rice: Use Japanese short-grain rice for that sticky, soft bite.
Seasoning Sauce
- Dashi (½ cup): A light Japanese broth made from seaweed and fish flakes. Vegan versions use shiitake mushrooms or kombu.
- Soy Sauce (2 Tbsp): Adds umami and saltiness.
- Mirin (2 Tbsp): A sweet rice wine that balances the soy sauce.
- Sugar (2 tsp): Just enough to bring the flavors together.
- Sake (1 Tbsp): Optional, but it removes any gamey chicken smell and tenderizes the meat.
Garnishes
- Mitsuba or Green Onion: Adds a fresh, herbal note.
- Shichimi Togarashi or Sansho Pepper (optional): A spicy kick or citrusy aroma for extra flavor.
Ingredient Substitutions
- Use JUST Egg or other egg substitutes for a vegan version.
- Replace chicken with tofu or plant-based “chicken.”
- Use vegetable broth or mushroom dashi if avoiding animal products.
Step-by-Step Cooking Instructions
Here’s how to make your own Oyakodon from scratch. You can cook it in a medium pan or use a traditional small oyakodon pan for a more authentic touch.
1. Prepare the Seasoning Sauce
In a small bowl, mix:
- ½ cup dashi
- 2 Tbsp soy sauce
- 2 Tbsp mirin
- 2 tsp sugar
Stir until sugar dissolves. Set aside.

2. Slice the Ingredients
- Slice ½ an onion into thin strips.
- Chop 4 sprigs of mitsuba or green onions.
- Trim fat off chicken thighs and slice them into small, bite-sized pieces using the sogigiri method (slice on an angle for even cooking).


3. Marinate the Chicken
Place chicken in a bowl and sprinkle 1 Tbsp of sake over it. Let it sit for 5 minutes.

4. Crack and Prepare the Eggs
Break 3–4 eggs into a bowl. Do not beat. Instead, use chopsticks to “cut” the whites 5–6 times. The goal is to maintain a marbled look—white and yellow should stay separated for visual appeal.


Hana’s Recipe Tips
Hana, a home cook from Tokyo, shares this advice:
“Don’t overcook the eggs. They should be silky, not firm. It’s okay if they’re still soft—they will keep cooking even after turning off the heat.”
Her second tip: use warm, freshly cooked rice. Cold rice can ruin the texture.
How to Cook Oyakodon
Using a Medium Frying Pan
- Place the onions in a single layer in the pan. Pour in the seasoning sauce to cover.
- Turn the heat to medium and bring it to a simmer.
- Add the chicken evenly over the onions. Once it starts bubbling again, lower heat to medium-low.
- Cook uncovered for 5 minutes, flipping chicken halfway through.


Add the Eggs in Two Steps
- Drizzle two-thirds of the egg mixture in a circular motion over the chicken and onions. Avoid pouring near the edges.
- Once eggs are semi-set, add the remaining one-third. Scatter chopped mitsuba or green onion on top.
- Cover briefly if needed. The eggs should be just set, not dry.


Assembling the Rice Bowl
- Scoop steamed rice into individual donburi bowls.
- Gently spoon the chicken and egg mixture on top. Include some sauce from the pan.
- Add a sprinkle of shichimi togarashi or sansho if desired.


Presentation Tips
- Don’t overmix the eggs—bright yolks add beautiful color.
- Serve hot, directly from the pan, for the best texture.
- Garnish with fresh herbs right before serving.

Storage and Make-Ahead Tips
- Leftovers: Store cooked chicken and egg mixture separately from rice.
- Fridge: Keeps well for up to 2 days in airtight containers.
- Reheating: Warm gently in a pan over low heat. Add a splash of dashi or water to refresh the sauce.
Note: This dish is best freshly made, as reheating can overcook the eggs.
Recipe Variations
- Spicy Oyakodon: Add a dash of chili oil or extra shichimi.
- Cheesy Oyakodon: Sprinkle shredded cheese during the last minute of cooking.
- Vegetarian Version: Swap chicken for mushrooms, tofu, or soy curls and use vegan dashi.
- Oyakodon Bento: Cool the cooked ingredients and pack over chilled rice for a delicious lunchbox.

Oyakodon (Chicken and Egg Rice Bowl) 親子丼
Course: Main CoursesCuisine: JapaneseDifficulty: Easy2
servings10
minutes20
minutes430
kcalA classic Japanese comfort dish where tender chicken, onion, and soft eggs simmer in a sweet-savory sauce and are served over a bowl of steamed rice. Quick, warm, and satisfying—perfect for lunch or dinner.
Ingredients
½ onion (about 113g), thinly sliced
10 oz boneless, skinless chicken thighs, cut into bite-sized pieces
1 Tbsp sake (or dry sherry, optional)
3–4 large eggs (at room temperature)
½ cup dashi (or vegetable broth for vegan option)
2 Tbsp soy sauce
2 Tbsp mirin
2 tsp sugar
2 bowls cooked Japanese short-grain rice
4 sprigs mitsuba or green onion, chopped
Optional: shichimi togarashi or sansho pepper for garnish
Directions
- Prepare the seasoning sauce
In a small bowl, combine dashi, soy sauce, mirin, and sugar. Stir well until the sugar dissolves. - Slice and prep the ingredients
Slice the onion thinly. Trim and cut the chicken into small even pieces. Sprinkle with sake and let it sit for 5 minutes. - Crack and cut the eggs
Crack the eggs into a bowl. Use chopsticks to cut through the whites a few times. Keep the yolks mostly intact for a marbled look. - Simmer the onions and chicken
In a medium pan, layer the onions and pour in the seasoning mixture. Bring to a gentle simmer, then place the chicken on top. Simmer on medium-low for about 5 minutes until the chicken is cooked through. - Add eggs in two stages
Pour in two-thirds of the egg mixture in a circular motion over the chicken. Let it gently set. Then, add the rest of the eggs and the chopped herbs. Cook until just set—soft and slightly runny. - Assemble the donburi
Spoon the hot rice into bowls. Carefully place the chicken-egg mixture on top. Drizzle extra sauce from the pan and garnish as desired.
Notes
- For extra color, you can add an extra egg yolk right before serving.
Don’t over-stir the eggs—keeping the marbled texture makes the dish look more traditional.
Vegan version: Swap chicken for tofu and use egg substitutes and vegan dashi.
Store leftover chicken-egg topping separately from the rice to keep it fresh.
Conclusion
Making Oyakodon at home is easier than you think. It’s quick, hearty, and full of Japanese flavor. Whether you’re new to cooking or a seasoned home chef, this dish brings warmth to the table. Try it once, and you’ll likely add it to your weekly rotation.
Don’t be afraid to play with the ingredients or seasonings. Cooking should be fun, and every bowl of Oyakodon is a chance to create something comforting and special.
Love Japanese comfort food? Don’t miss our Shio Ramen recipe, another delicious bowl full of umami flavor and warmth.
FAQs About Oyakodon
Is Oyakodon healthy?
Yes. It’s high in protein, uses minimal oil, and is low in sugar. Use brown rice for extra fiber.
Can I use chicken breast instead of thighs?
Absolutely. Thighs are juicier, but breasts cook faster and are leaner.
How do I make it vegetarian?
Use mushrooms or tofu instead of chicken, and replace the eggs with a plant-based alternative like JUST Egg. Make sure to use vegan dashi.
Can I prepare this ahead of time?
Yes, but keep the egg and chicken mixture separate from the rice until ready to serve. Reheat gently to avoid overcooking the eggs.
What makes Oyakodon different from other rice bowls?
The combination of chicken and egg in a dashi-soy broth makes it softer and sweeter than something like Gyudon (beef bowl). It’s also less greasy and more comforting in texture.
Ready to try making Oyakodon? With just a few pantry staples and 30 minutes, you can bring a taste of Japan to your table tonight.
Let us know how your version turns out and what twist you added to make it your own!
If you love exploring authentic Japanese food and culture, check out this guide to 5 hidden gems in Kizakura Kappa Country. It’s a unique destination full of local charm and culinary traditions.