Have You Ever Tasted Bread So Soft It Feels Like a Cloud?
Imagine a bread so fluffy, light, and tender that it melts in your mouth. Picture a loaf that’s gently sweet, with a golden-brown top and a fluffy white interior that melts in your mouth.
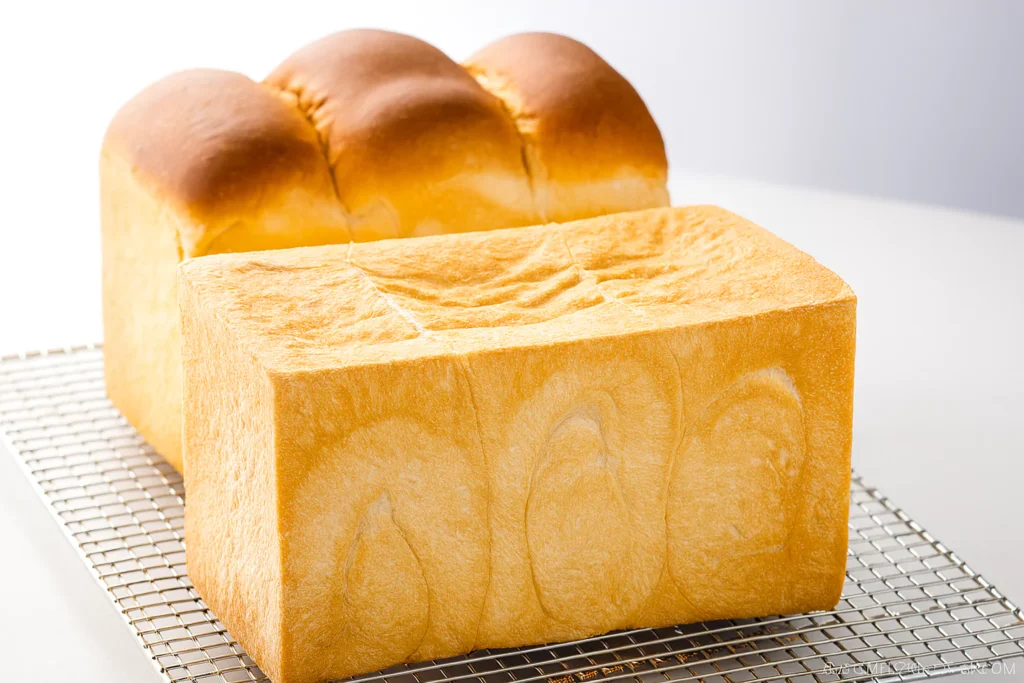
That’s the charm of Japanese Milk Bread, better known as Shokupan (食パン)—a staple in Japanese homes and bakeries. It’s not just bread it’s a comfort food, a staple in Japanese kitchens, and a must-try for any home baker.
In this post, you’ll learn how to make authentic Shokupan from scratch. Whether you’ve baked bread before or this is your first time, this guide will help you make a beautiful loaf right in your own kitchen.

Shokupan 食パン @JapanDishes
Overview: What Makes Japanese Milk Bread Special?
Japanese Milk Bread stands out for its:
- Ultra-soft, pillowy texture
- Light sweetness from honey and milk powder
- Versatility in both savory and sweet recipes
- Beautiful tall loaves with flat or rounded tops
This recipe is ideal for beginner to intermediate bakers. While it takes a few hours due to kneading, rising, and baking, the process is fun and relaxing. The reward? Fresh, homemade Shokupan with no preservatives—just pure, wholesome flavor.
What is Shokupan (食パン)?
Shokupan (食パン) simply means “eating bread” in Japanese. It’s the standard white bread sold in Japanese grocery stores, bakeries, and convenience stores. But don’t let the name fool you—Shokupan is in a class of its own.
What makes it different?
- Tangzhong or Yudane methods (some recipes use these techniques to make it softer)
- Milk and butter give it a rich flavor
- Slow fermentation creates better texture and taste
This bread is eaten for breakfast, used in sandwiches, or served toasted with butter and jam.

Shokupan 食パン @JapanDishes
More Recipes You Can Make with Shokupan
Once you’ve mastered your homemade Japanese Milk Bread, don’t stop there! Shokupan (食パン) is wonderfully adaptable, making it the perfect base for a wide range of delicious dishes. Here are two popular ways to enjoy your freshly baked loaf:
1. Make a Fresh and Fruity Dessert Sandwich
One of the most iconic ways to enjoy Shokupan in Japan is by turning it into a sweet sandwich called Fruit Sando. Soft whipped cream and colorful fruits like strawberries, kiwi, and oranges are layered between two slices of fluffy milk bread. It’s light, fresh, and perfect for snacks or picnics.
Learn how to make it here:
👉 Fruit Sando – The Perfect Japanese Dessert
2. Try the Famous Japanese Egg Sandwich (Tamago Sando)
Another popular dish made with Shokupan is the creamy and comforting Tamago Sando, or Japanese Egg Sandwich. This sandwich is known for its smooth, mashed egg salad filling made with Kewpie mayo and soft-boiled eggs. It’s a staple in Japanese convenience stores and cafés—and it tastes even better when made with homemade Shokupan.
Get the full recipe here:
👉 Japanese Egg Sandwich (Tamago Sando)
These two recipes are perfect examples of how one simple loaf of Japanese Milk Bread can turn into something truly special. Whether you love sweet flavors or savory bites, Shokupan makes the perfect base.


Key Kitchen Tools for Making Shokupan
To make Japanese MilkBread at home, having the right tools makes a big difference:
1. Japanese Loaf Pan
- Rectangular: 4.7 x 7.8 x 5.1 in. (12 x 20 x 13 cm)
- Square: 4.7 x 5.3 x 5.1 in. (12 x 13.5 x 13 cm)
- These pans help give Shokupan its classic tall shape

2. Stand Mixer
- Speeds up kneading and helps achieve the perfect gluten structure
- KitchenAid Artisan or similar with a dough hook is ideal
3. Digital Kitchen Scale
- Precise measurement is key for consistency
4. Dough Scraper, Rolling Pin, and Pastry Brush
- Helps with shaping and preparing the dough for baking

Shokupan 食パン @JapanDishes
Essential Ingredients (For 1.5 Kin Rectangular Loaf)
Here’s what you’ll need:
- 250g warm water (not too hot)
- 20g sugar (adds slight sweetness)
- 7g kosher salt (flavor balance)
- 10g honey (for rich taste)
- 7g instant yeast (or up to 25% more active dry yeast, proofed)
- 350g bread flour (high-protein flour for strong gluten)
- 20g skim milk powder (or coconut milk powder for vegan)
- 25g unsalted butter (or plant-based option)
- ½ tsp neutral oil (for greasing bowl)
- 10g butter (for greasing pan)

Substitutions:
- Use plant-based butter and coconut milk powder for a vegan version
- If needed, you can swap bread flour for all-purpose, though the loaf will turn out a bit less structured and softer.
Step-by-Step Instructions
Follow these steps carefully for perfect Shokupan:
1. Prepare Yeast Mixture
Mix warm water, sugar, salt, honey, and yeast. Let it sit for 10 minutes until foamy. If there are no bubbles, your yeast might be old.

2. Mix Dry Ingredients
Add the bread flour and milk powder to the bowl of your stand mixer and mix them together. Make a well in the center.

3. Combine Wet and Dry
Pour yeast mixture into the well and mix until incorporated. Save the bowl for later.


4. Initial Kneading (Stand Mixer)
- Speed 2 for 2 minutes (get started)
- Speed 4 for 4 minutes (dough becomes smoother)

5. Add Butter
Add cubed butter, knead:
- Speed 2 for 2 minutes (incorporate butter)
- Speed 4 for 4 minutes (dough stretches)

6. Final Kneading
- Speed 6 for 3 minutes—this is where the dough becomes shiny and elastic. Be careful, the mixer might wobble.

Secrets to Success and Expert Tips
- Always weigh your ingredients—volume is unreliable.
- Use fresh yeast. If it’s over 6 months old, toss it.
- Windowpane Test: Stretch a bit of dough—if it forms a thin “window” without tearing, gluten is developed.
- Don’t skip slamming and folding—it builds structure.
- Don’t let dough overproof—this ruins texture.
Dough Assembly: Build the Loaf
1. First Rise (Bulk Fermentation)
Let the dough rise until triple in size. Use a warm place or oven with “Proof” setting at 100ºF.


2. Divide Dough
Weigh the dough and divide into 3 equal pieces. Form into smooth balls.

3. Bench Rest
Place a moist kitchen towel over the dough and allow it to relax for 15 minutes.

4. Shape Dough
Roll out each piece into a rectangle. Fold like an envelope, roll up tightly, and pinch to seal.


5. Place in Pan
Arrange rolls seam-side down in the loaf pan with swirls facing inward.

Hana’s Recipe Tips
- Roll with care: Don’t use too much flour when rolling; it’ll slip.
- Be gentle: Overworking dough during shaping causes uneven rise.
- Consistency: Apply the same rolling pressure to all 3 dough pieces so they rise evenly.
- Start with rectangular loaf pan: It’s more forgiving and gives you more surface area for toasting.
Baking the Bread
1. Second Proof
Let dough rise in the pan until it reaches 85–90% of the mold’s height.
- Flat-top Shokupan: Proof to 75–80% and cover with the lid.
- Round-top Shokupan: Let it rise higher and bake uncovered.


2. Bake
- Flat-top: 415ºF for 25–30 min
- Round-top: 385ºF for 30 min
- Drop the mold after baking to release steam and prevent shrinking.


Storage and Make-Ahead Tips
- Store whole loaf in a plastic bag at room temperature for up to 2 days
- For longer storage, slice and freeze. Toast directly from frozen
- Do not refrigerate—it dries out quickly
Recipe Variations
Try these fun twists:
- Cheese-filled Shokupan: Add shredded cheese during rolling
- Matcha Shokupan: Add 1 tbsp matcha powder to the flour
- Sweet Red Bean (Anko): Spread anko paste before rolling up
Conclusion: You Can Make Bakery-Level Bread at Home
Baking your own Japanese Milk Bread, or Shokupan (食パン), at home is a truly rewarding and delightful process. The result is better than any store-bought loaf—warm, soft, and made with care. Whether you like it toasted with butter or used for a sandwich, shokupan will become your new favorite.
So grab your loaf pan, gather your ingredients, and let the aroma of freshly baked bread fill your kitchen.
FAQs About Japanese Milk Bread (Shokupan)
Q1: Is Japanese Milk Bread healthier than white bread?
Yes. It contains less sugar and no preservatives. You can also control the ingredients for healthier versions (like whole wheat or vegan).
Q2: Why is it so soft?
The long kneading process builds strong gluten strands, and the addition of milk powder and butter makes it tender and fluffy.
Q3: Can I use all-purpose flour?
Yes, but bread flour is better for texture. All-purpose flour will yield a softer but less structured loaf.
Q4: How can I keep it fresh longer?
Freeze it! Cut the bread into slices, store them in a freezer-safe bag, and simply toast whenever you’re ready to enjoy. It stays fresh for up to a month.
Q5: Can I make it by hand?
Yes. It takes longer and more effort, but it works. Make sure to knead the dough well enough for it to stretch thin without tearing—that’s how you know it’s ready.
If you loved this Shokupan recipe, don’t forget to check out our Japanese Cheesecake スフレチーズケーキ another soft and sweet favorite!
For more recipes, tips, and travel stories, visit japantovisit.com.

Japanese Milk Bread: How to make Shokupan 食パン
Course: Blog1 rectangular loaf (1.5 斤 kin size)
servings30
minutes30
minutes200
kcalKnown as Shokupan (食パン), this traditional Japanese Milk Bread is cherished for its soft, airy crumb and gentle hint of sweetness. Whether enjoyed toasted or in sandwiches, this homemade version gives you that soft, pillowy goodness fresh from the oven.
Ingredients
- For the Dough:
250 g warm water (about 104°F / 40°C)
20 g granulated sugar
7 g kosher salt (Diamond Crystal)
10 g honey
7 g instant yeast, or the same amount of active dry yeast that has been proofed beforehand.
350 g bread flour
20 g nonfat dry milk powder, or use coconut milk powder as a vegan alternative.
25 g unsalted butter at room temperature, or replace with a plant-based alternative for a vegan version.
- For Greasing:
½ tsp neutral oil (for bowl)
10 g butter or oil spray (for pan)
Directions
- Activate the yeast
Mix warm water with sugar, salt, and honey in a bowl. Add the yeast and let it rest in a warm spot until you see foamy bubbles—this shows the yeast is active. - Combine dry ingredients
In a mixing bowl, blend the bread flour with the milk powder, then create a hollow in the middle to hold the liquid ingredients. - Mix and form the dough
Add the prepared yeast mixture to the bowl with the dry ingredients. Stir until a rough dough forms. - Knead with a mixer
Using a stand mixer with a dough hook:
Knead on speed 2 for 2 minutes
Then knead on speed 4 for 4 minutes
Add the butter in small pieces and knead until fully absorbed
Finally, knead on speed 6 for 3 minutes, holding the machine if needed - Test the dough
Do the windowpane test: stretch a piece of dough to check if it becomes thin and translucent without tearing. If not, knead 2–3 minutes more. - First proof (bulk rise)
Shape the dough into a ball with a smooth surface. Transfer the dough to a lightly greased bowl, cover it, and allow it to rise in a warm spot until it becomes three times its original size, roughly 40–60 minutes. - Deflate and divide
Gently release the gas from the dough. Split the dough into three even pieces, shape each one into a smooth ball, and cover with a damp towel to rest for 15 minutes. - Roll and shape
Using a rolling pin, gently roll each dough ball into an oval shape. Fold in thirds, then roll up tightly from one end to form a log. Pinch to seal. - Arrange in pan
Grease the loaf pan and place the 3 rolled pieces seam-side down in the pan with swirls facing inward. - Second rise (final proof)
Cover the pan loosely and allow the dough to rise again until it’s about 85–90% of the pan height. - Bake the bread
Preheat the oven to 385°F (195°C) for a round-top loaf. Bake for about 30 minutes, or until the crust is golden brown and sounds hollow when tapped. - Cool before slicing
After baking, drop the pan gently on a surface to release steam. Remove the loaf from the pan, place it on a wire rack, and allow it to cool fully before cutting.
Notes
- Use a digital kitchen scale for best accuracy.
Avoid over-kneading—the dough should be soft and elastic, not sticky.
Use a Japanese loaf pan (1.5 kin) for an authentic shape, or substitute with a 1 lb pan.
When working with active dry yeast, dissolve and proof it in a portion of the warm water from the recipe before adding it to the dough.
For longer storage, slice and freeze the loaf after cooling.